Origami shirt !


I've been wanting to try making an origami shirt for a long long time already.....in fact, it all started when my friend CC Peyton who was living in Hawaii sent me a handmade card she and her hubby made using handmade paper and a Hawaiian origami shirt she made using wrapping paper. I loved it! I always kept thinking that it was so difficult to make the origami shirt.....never believing that I could make one myself. But ever since I started to experiment on new crafts recently, I thought to myself......why not??? Why not just give it a try. At least try to do something that I actually love having and can use for my handmade cards. :)

So what I did was......I googled about the origami shirt and searched for it on Youtube for video tutorials that would show a clear detail on how to make this origami shirt. After watching dozens of tutorials on Youtube....I realised that there are not only one type of instructions on how to make the origami shirt.....there are quite a few of them!!! Gosh!! That's when I got confused on which one I would like to try out. At first I tried the simplest one......then I tried the ones that are a little bit complicated. Then in the end....I chose the ones that would suit my taste and would actually look nice on a handmade card. I wanted to share the video tutorials I love best here that shows two types of origami shirts.

The first video shows how to make an origami shirt with the sleeves folded at the end of it. It looked pretty cool that way :). The second video shows how to make the sleeves look like the real sleeves on a real shirt. It has a passage where the arms can go through. So I fancy both of these origami shirts, because of the sleeves. The other videos I checked had sleeves that were pretty common and nothing special to it. You can check it yourself on Youtube. I also have this PDF link that shows step by step instructions on how to make the origami shirt. Check it out HERE.
  
I've made a card and embellished it with origami shirts yesterday. I will be posting an entry about it soon!! :). In the mean time...do enjoy the video tutorials! Have fun making origami shirts ya! ;)



Quilled flowers

HB076

This birthday card was requested from me last March!!! Gosh....my customer is so patient with me.  It's not easy to come up with an idea.....it takes ages for me to figure it out.....maybe the creative juice is all dried up!! :P Luckily for me she said I can do whatever I like with the design, so I took the opportunity to do another quilling pattern for this birthday card which was custom made for her daughter in law. 

I've been wanting to try out this layout for this quilling technique. But I wasn't quite sure how to arrange the quilled papers to make a good arrangement. It's so difficult to decide! So I kept arranging it over and over again until I was satisfied with the colors and arrangement of the flowers and leaves, before pasting them on the card itself.
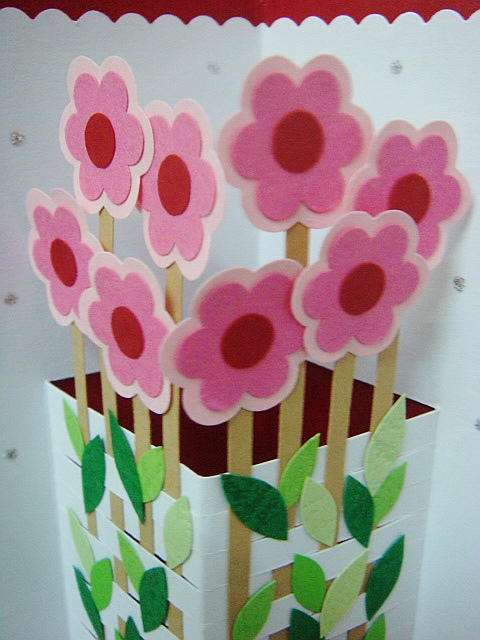
I made a simple pop up flowers arrangement inside the card using my favourite pop up style....which is the weaving style that I love so much to do when it comes to arranging flowers. It's much easier to arrange them this way....in my opinion that is hehehe. I really hope she likes it!! :)


Brass stencil and glitter powders

OMG! I was browsing through the video tutorials on Youtube and I found this really cool tutorial that I would like to share with everyone here. I would love to try out this technique!! So cool!!! But first I need to get me some really fine glitter powders......or perhaps just experiment with the glitter powders that I already have in my collection. The size of the glitter powders I have is a bit bigger though but I guess it can be used for this technique. Another thing I need to get is that big sticky paper.......for the glitter powders to stick on. Hmmmm......not sure where to get those yet....but will search for it at the nearest stationary store soon. :) Meanwhile.....enjoy the video!!


Brass stencil


OK!!!! After watching that dry embossing video tutorial yesterday, I decided to give it a try at dry embossing using a brass stencil. I only have one of these beauties hehehehe. I bought this brass stencil at Craft Haven, One Utama. They have so many varieties of brass stencils there. You will be spoilt for choices! I on the other hand didn't have enough money at the time to buy the different patterns.....huhuhuhu......so I only bought one....for my collection....booohooohooooo so sad :(. 

Anyways! Back to the experiment heheehhee......as you can see from the photos I lined up above.....you can view the step by step process of the dry embossing technique I did. First I chose the pattern on the brass stencil that I would like to have embossed on the four corners of the small gift card. I then chose a paper that is not too thick and light in color for me to see through the image of the patterns on the brass stencil behind the card. If it's too thick then it would be difficult to see through it or to emboss the patterns.

I emboss the chosen pattern one by one on each corner of the card. And tadaaaaaaaaaaaaaaaaaaaaaaa!!!! It's done! Now all the corners have that embossed flower pattern on the card. It's not that hard to do and it only takes a few minutes to get it done. :) BUT....if I had a light box like the one shown in the video tutorials, it would be much faster and easier for me to do it. And there won't be a lot pressure marks on the card like the one I made. I was basically pressuring the paper with the stylus blindly coz I couldn't see the patterns of the stencil behind the card....hehehe. Perhaps I can find a better solution to this later on....but for now, this is how I did it...... :).

Dry embossing - first experiment!!!


You must be wondering what is dry embossing right??? hehehe......well, this is just one of the other craft technique that I've been wanting to experiment since last year. I've seen someone doing it before but I can't remember her blog address or blog name huhuhuhu.....been trying to find her blog all morning but couldn't find it. I've bookmarked her blog in my old PC. Gosh.....I've lost a lot of good bloggers since I started using the new PC.....I forgot to keep the blog address somewhere so that I can trace  them back. Sigh......I wanted to show you guys how she did it. It's similar to what I've done but she did it better than me of course hehehe.  She has been experimenting it quite a lot and made handmade cards and bookmarks with this technique.

Well......I wanted to do this technique for a long time already but since I didn't have the tools to do it, so I couldn't do it yet. Until one day when I was in KL a few months back, I came across these tools at the same time I found the quilling tools. Same shop.....the Scrapbook Memories Craft Shop at One Utama. It's quite expensive though.....I'm not sure if they sell it at any other craft stores since I've never checked at the other craft stores yet. So.....maybe at other places you can get it cheaper....I donno....hehehe.....coz I only found out about it when I went to that particular craft store.

I just tried a simple technique......punch out a flower using a medium sized flower craft punch. Then I used the big tip embossing tool to emboss the petals of the flower by pressing on it with the big tip in a circular motion. I pressed it on a soft fabric mouse pad. After using the big tip embossing tool......I then press it again in a circular motion using a small tip embossing tool to emboss the petals further. And tadaaaaaaaaaaaaaaaaaaa.......it's done! Simple ya?? The simplest ever embossing experiment hahahahaha! :D

Can you see the difference between the orange flower that I punched out using the flower craft punch and the other 3 flowers that I craft punched and dry embossed? You can see the 3 flowers that I dry embossed have that raised effect right? Unlike the orange flower that is really flat. :)

So what is dry embossing?? You can read more about it at these links:


Prizes posted!


I'm so relieved that I managed to get all the prizes packed and posted today to all the lucky winners of May 2010 Blog Giveaway. Phew!! Oooooooopppppssssss......yes, there is one hiccup though......you see there is one more lucky winner who didn't respond.....and she is....jeng jeng jengggggggggg............

MY ONLY ONE

Yes......one more delivery to make huhuhuhuhuhu........why oh why is she not responding....only God knows.....I've already posted a message at her blog......sent her an email........if I knew her phone number I would have smsed her......but I don't know how else to contact her. 

This kinda thing used to happen before......in which I had to give the prize to someone else because the winner did not respond. I'm giving her another chance......I'd like to think she probably has some internet connection problem .....or extremely busy with work........or hmmmm.....donno laa.....perhaps caught in some kind of problem that she is not aware of the announcement I made last week regarding the winners of the giveaway.

I'm giving her till end of this week to email me her details. If she still does not respond.......then I will have to give the prize to someone else lorr.... :( Too bad ya......SO.....please...please email me as soon as possible my dear or else the prize will be given away to new winner hehehe......

Please vote for my June 2010 Blog Giveaway!!

Hello everyone! Today I'm doing another poll to help me decide which theme I'll be doing for my June 2010 Blog Giveaway. I added the poll at the top right side part of the blog. I plan to use the quilling technique  on any of the themes.....so just tick on the theme you love most ok? :)

You will have 3 themes to choose from:

1. Floral theme
2. Love theme
3. Birthday theme

I know that most people would prefer the love theme.......but there are some who prefer the floral or birthday as well......so please let me know what you would like to win for the June 2010 Blog Giveaway by voting at this poll. A floral theme card.....a love theme card or a birthday theme card :). There will be 6 prizes to giveaway for month of June and I'll only be giving away one card per person. I do plan to add something else together with the card prize.....but that will be a surprise!!! heheehe......you will have to wait till I post an entry about the giveaway soon. 

The poll starts today and will end on the 7th of June 2010. 

SO please....vote vote vote!!! Thank you!!! :)
XOXO,
Lin

Colorful quilled heart card

V026

I got a little carried away today and made this colorful quilled heart card with a purplish pink theme. I've always loved this color combination :). It's a soft and sweet combo. 

Actually.......what happened was.....I thought of using this design for the next blog giveaway.....I was thinking of a simple design that I can do for the prizes......since this time around I need to give away 6 cards for 6 lucky people. So I can't do something that would be too overly complicated.....coz then I might not have the time to make them. Hmmm....decisions decisions......

To be honest......this design looks so easy right? So simple......but the fact is.....it is quite time consuming.  You know why? Because the quilled paper are not of the same size.....they are randomly quilled paper of different length and different color. I wanted to make sure there aren't many gaps in between them....so that's why they come in different sizes. Big, medium, small and teeny weeny quilled papers.... :). Right now I wish I have a paper shredder.....hahaha......coz I really hate the cutting part.....I just love to quill the paper....not cut them hahaha LOL! 

I was also thinking of the wordings to put on the card.......I couldn't decide on what to write on it......or print on it......or stamp on it......errrmmm....I guess it would be pretty hard to stamp on it since the paper I used for the card has texture on it.....so I can't stamp on it just like that.....coz then the stamped wordings wouldn't look even on the card or can be seen clearly on the card because of the rough texture.

Sigh.......I'm still in the experimenting phase......this card is not finished yet......still have to worry about what to pop in the inside. I still can't decide what to do. This card is quite big.....half A4 size.....so the heart is quite big as well......thus requiring me to quill more paper in order to make the big heart shape.... gosh...I wonder how many quilled paper I used for this heart....probably near 100?? Donno laaa......too lazy to count hahahaha.....

Hmmmm......anyways I still can't decide what size, shape or theme I'm going to do for the June 2010 blog giveaway.....should I just stick with this heart design or do floral patterns? Perhaps I should do another poll to for readers to vote for what they prefer for the next prize ya? That could probably help me decide. Anyways....if you have any suggestions....I would love to hear it! Thanks! :)

MAY 2010 BLOG GIVEAWAY WINNERS!!!!

Good evening to all of my lovely readers! Sorry for being a little late with the results of the blog giveaway. It's been a pretty hectic day for me indeed! Phew! I'm so happy that finally, I have finished checking all of the names of participants for this month's blog giveaway .........and I have done the lucky draw to picked the 5 lucky winners. :)
For this month.....there were quite a number of participants....I'm quite happy that many are trying their luck at winning this month's prizes. :) I've checked one by one and altogether there were  about 36 bloggers who joined in! A lot more than last month's :). I've also received so many feedback and suggestions for my card blog.....and it's so wonderful! I'm so overwhelmed by your support to make this blog a better card blog in future. Thank you so much. I've already implemented some of your suggestions and I'm thankful for it because sometimes I myself don't notice what is missing here. It's good to have feedback from readers so that I can improve the blog and make it more interesting and informative as well. :) I really really appreciate it!

Ok! Now it's time to announce the names of the 5 lucky bloggers who have won themselves each a  love theme pop up card. Check them out below:

 SYIRA MIA ARIYS WORLD
.
.
AMANDA ELTIQAZ
 .
.
NURAARIN
 .
.
MY ONLY ONE
 .
.
 KEMBARA HIDUP


CONGRATULATIONS TO THE WINNERS!!!! Please email me  as soon as possible your full name and complete mailing address plus your active contact number for mailing purposes. I will post the prizes to you by next week! 

Heartfelt thanks to all who have participated in my May 2010 Blog Giveaway. I really appreciate your effort and all your lovely wishes......I'm overwhelmed by them! Thank you so so much! For those who did not win this month, don't be sad :( ......do try your luck again next month for more interesting prizes to win! 

p.s. I'm thinking of giving away quilling pop up cards next month hehehehhehe! Ok or not???? ;). Whatever it may be....a simple quilling or with pop ups.....I hope it has something to do with quilling since I love it so much now!! ;)

XOXO,
Lin

Pop up balloons!

HB075

This is a very simple birthday card design for a little girl :) I had a request to do a birthday card for this little girl from a regular customer of mine and was given the freedom to do whatever I wanted. I wanted to experiment on the birthday cake using the quilling technique but decided to make the cake using foam instead. So for the candles I wanted to do the quilling as well....but somehow the rolled candle like paper didn't fit in well with the foam cake. So I used something else instead as the candle and made the fire using quilled tear drop shapes. 

I scattered and glued so many tiny cubes of foam of various colors on the card . I like that 3D effect it gives:) For the pop up....I love using the weaving technique.....so I weaved the paper strings of the balloons on the square pop up to make it look like it's floating hehehe. It's very simple and easy to do. :) It's a very colorful card indeed! :)

Last day of May 2010 Blog Giveaway!!!


Oh my God......time sure flies fast.......today is already the last day of May 2010 Blog Giveaway! The giveaway ends at 11.59pm tonight.....so there is time for you to join and stand a chance to win this lovely handmade love theme pop up card :). 

Do click HERE to go to the May 2010 Blog Giveaway post and find out how to enter there.

Follow the simple steps and be a part of the giveaway now........it's an opportunity you wouldn't want to miss!!

Those 5 lucky people who wins this particular handmade love theme pop up cards will be the first 5 people to own this card design.....because I have never sold this card design to anyone yet or used it for my own personal use. So those 5 lucky people will be the first to own and use the cards. :)

So be a part of this giveaway now and stand a chance to be one of those 5 lucky owners of this handmade love theme pop up card!!!! 

I would like to wish all the participants all the very best!! I shall announce the names of the 5 winners once I have checked and done the lucky draw :).  A big THANK YOU to all who have supported the blog giveaway for the month of May. God bless you all!!
XOXO,
Lin

My blog featured in InTrend Magazine :)


:) I was so surprised when I was informed by one of my blog readers yesterday that my blog was featured in InTrend Magazine June 2010 issue. I couldn't believe it at first.....until shortly after that I received an email from another customer mentioning that she knew about my card blog from the Intrend magazine! :D I had no idea that I was one of the bloggers featured in the Gaya Hidup : Klik and Blog segment. So, a big thank you to Asri for informing me hehehehe.....otherwise I would have never known about it! LOL! I didn't have the time to look for the magazine yesterday, so this afternoon I went to search for it.....luckily it's available at a nearby shop. :) This is the first time I bought this magazine....quite an interesting magazine I must say....quite good in quality hehehe......

In short.....they mentioned about how my customers are able to share their ideas with me in producing a personalized handmade card for them. It's true that some of the custom made handmade cards I've created here were sometimes produced with the basic ideas given to me by my customers.......in the initial stage when we discussed about the colors of choice, themes, wordings, and what type of pop ups they prefer.....I do love to know and find out what my customers really want in their personalized  handmade cards. This is to ensure that they will get what they can't get in the usual card stores. It's important that I materialize their dreams. :) And by knowing what they want....I will try my level best to make it happen for them ....God willing :).

I would also like to say a big thank you to InTrend magazine for featuring my blog this time around.......even though I did not get to be the "Chosen Blogger"....it doesn't matter....as long as I was featured in it hehehe. It's an honor really :). Mucho mucho gracias everyone! :)

Tri-color quilling flowers.....

AC004
Another pending order ready for delivery today :) I'm so happy I managed to get this done on time hehehe. This was a request from my customer who was interested in my HB014 card design. She especially loved the sexy pop up lips inside the card. But for the front design I changed it so that it would look different. I'm always trying to make it different every time.....even if the changes are minor ones....at least it's different from my previous designs.

This time the changes is quite obvious because I'm using the quilling technique :) As you all know, I'm quite obsessed with it lately.....so I'm experimenting with it on most of my new designs..hehehe. I'm quite happy with how it turned out.....the flowers I made had 3 colors in it.....red, blue and white. Actually my customer wanted this card to be in a combination of red, blue, black and white......but I decided not to add the black because I didn't think it was suitable for this particular design. Perhaps for other designs it would be good to add the black. So I tried my best to use all those colors....and added some gold and beige as well to match it all up. At first I didn't think that gold and beige colors would be suitable but in the end.....I thought it looked ok with me :) I like it! hehehe!

As I was making the sexy pop up lips....I remembered that it was my first pop up experiment in 2008...how long time ago that was....and how scared I was making it for the first time. I didn't have the confidence to do it back then, and I didn't know anyone at that time who was able to help me, I figured how to do it on my own...I'm glad my customer gave me the support. :) I used to think it was so difficult to do it....but now I can say how easy it is to pop that sexy lips. It took me years to understand the mechanics of pop ups.....but I'm getting there....not an expert yet....but I'm getting there...God willing :).

Quilled heart card....

V025 

I'm so into someone right now.....and was thinking of giving this to him when the time is right..... :). It's suppose to be so easy to just give it to him....but then again maybe....maybe it can wait a while. Fear is always the case. :I

I'm so happy to do this very simple quilled heart card for the first time after watching the Youtube videos for ideas.....Youtube has so many tutorials that we can get ideas from and be inspired :). I was thinking of my button and sequins heart all the time when doing this.....it's a similar pattern except that instead of using buttons and sequins, I used quilled circles instead. The quilled circles are in different sizes as you can see. 

Believe you me......this design is never going to be exactly the same each time I make it because it was made spontaneously and furthermore I never measure the heart shape or drew the shape of the heart in advance. I just arranged the quilled circles one by one randomly. So, the next time I make this, it will look slightly different from this one. So each person who orders this card will get one that is one of a kind. :)

I made this design on a note size card.....quite small one about A6 size. Cute size card to be given to a cute person ehehehhee....

Quilling flowers on anniversary card....

AC003

I'm so happy that today I managed to finish doing this anniversary card using this quilling technique hehehehe :). I have been thinking of doing this technique for the orders I've received. Luckily my customer was interested in this quilling technique as well, so I have the freedom to do it for her anniversary card :)

Why I made this anniversary card in a soft blue color? Well.....this is because my customer informed me that her hubby's favourite color is soft blue.....and she was hoping that I can apply this color for her anniversary card. She was interested in the AC001a card.....especially the pop up inside the card, so I tried to follow that pattern and added some flowers to it too. What she loves most about the pop up is that I can put her name and her hubby's name on it. 

I didn't make the heart shapes for the pop up in the usual red combination like the one in AC001 because then it won't match the front design. So I thought it would be nice to see heart shapes in colors other than red, pink or maroon......I chose something that perhaps be suitable for men.....since this card will be given to her hubby. :) I really like the color combination for this card.....I think it looks fresh and sweet :).

Gorgeous Blogger Award!


:) Oh how sweet! Just a few days ago, I received this award from a sweet fellow blogger Aisyah Helga from My Tinker Space. Thank you dear Aisyah! I really appreciate it! I love visiting her blog to check out her beautiful and colorful crochet work and her DIY projects....they are fun!! :)

Ok...now for the rules.....
A. Accept the award and thank the person who gave it to you. ----> DONE!

B. List 10 things about yourself  -----> DONE!
    1. I'm half Malay and half Indian. :)
    2. I can barely speak Tamil but am interested in learning Mandarin...:)
    3. I am an Art & Design graduate....majored in Ceramic Design.
    4.I love surfing the net for hours.
    5. I love to drive but don't own a car :P
    6. I'm 5 feet 4 inches tall.
    7. I love the latest Mini Cooper....hope to own one someday ;)
    8. Still single... LOL! :P
    9. I love watching the food channel....AFC.
  10. I work from 9.00am till 12.00am. :P

C. List 5 additional things you DON'T like ----> DONE!
1. Long fingernails.
2. Lazy people.
3. Snakes!
4. Idiots.
5. Liars. 

Then pick ten people to give this lovely award to! -----> DONE!
So hard to decide.....so I randomly pick bloggers who I like to visit :)


Featured Post

How to make two tone tear drop shape quilling flowers

We are coming close to mid February and I'm blogging about something that I did last January! LOL! It's been a month sin...