Showing posts with label Beads on cards. Show all posts

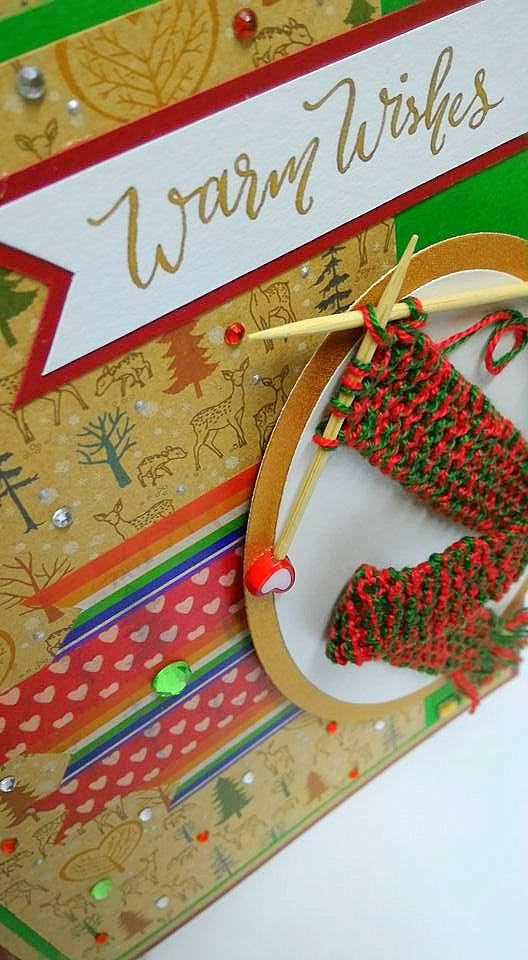
Miniature hand knitted scarf on Christmas card


Hello again! 
Today is the day! It's Christmas day! When people are busy celebrating Christmas and enjoying their holidays, here I am writing about my second Christmas card design for 2017. This is a card made for a dear friend of mine. I planned to post it before Christmas just like the other card I made, but unfortunately, it had to be postponed. Boohooohooo!! So sad!

I made something for my friend and I plan to post it along with this card. Until that gift is ready, I can't post it yet. So I'm pretty stressed out here trying my level best to get it done before the year is over. It could be a new year's gift as well, so I'm working as fast as I could to get it all done on time. 


I really enjoyed making this miniature scarf for the card. It's just so cute. I think I made so many of them in the beginning when I was experimenting with the measurements. I had to make sure they would fit nicely on the card. In the end, I think I made it  a bit too long for the card. To be honest, it took me longer to make the scarf compared to making the miniature sweater. Next time I'll make the scarf shorter. Lesson learned! LOL! Since it's for a Christmas card, I used a dark green and red yarn for the scarf. It's a lot harder to knit with such a small yarn but with lots of practice, it gets easier.

One thing for sure.....knitting takes such a LONG time to finish. It takes FOREVER!! hahahah!! So although the design is simple, it sure is time consuming. Since I myself am just a beginner, it takes much longer to get the job done compared to experts hahaha.


As always, every time I want to write the sentiment on the card, I will use my Speedball calligraphy pen and my favourite ink from Dr Ph Martin. I just love how smooth the ink is. Although my writing is not that great, somehow the pen makes it look good...LOL!! Believe me, the pen sure do wonders! Come to think of it, I need to get more colours for the ink. I keep using the same gold colour for my cards, over and over again. 


I really love the knitting needles that I made for knitting the scarf. Especially because of the heart shape beads that I used for them. I don't have a lot of them in my collection. Just a few left! I bought them years ago when I was staying in Kuala Lumpur. I see a lot of people who makes miniature knitted scarf for cards would use round beads like the ones I used for the miniature hand knitted sweaters. But for this one I just had to use the heart shape ones, for a couple of reasons. One because they match the colour of the scarf and second because the person who is receiving it loves hearts so much. ❤❤❤


Love themed birthday swing card

HB119

Another swing card design for this month. It's a birthday card this time. A lot of dark red and green combination with this one. In fact I think there's quite a lot of red going on here! hehe!

I wanted to use the big wooden flower bead that I got last year as the focal point of the card. The one and only stock I have! haha! I guess this card is a combination of a lot of things that are limited in my collection. Some were given....some were bought. The ones that were given, was kept for quite a while with me because I adored them too much to use them..... But I can't keep them with me for too long ....I have to use them some day right? Otherwise, there will be too many craft stock inside my room and very little space left for me to do work there.

There were some parts of the card where I applied some molding paste. Flower patterns this time around seemed suitable since there are a lot of flower designs on the pattern paper itself. I enjoyed decorating the card using molding paste although it is quite a messy type of craft. But seeing the pattern formed on the paper somehow thrills me :D. Textures gives the card a different feeling. Hence, more molding paste artwork projects coming this year.

Played with a couple of clear stamps that I bought from Popular Bookstore. They seem to sell a lot of new cool designs there now. Super cheap too! I couldn't resist buying them every time I visit the shop. In fact I just bought some new ones yesterday. Ooooppppps! There goes my budget this year!! LOL! They also sell a lot of pretty acid free pattern papers. Very affordable as well. I like that very much!! :D Hope it stays that way for a long time hahaha!

Happy 33rd Birthday

HB092

I've been having issues with my computer for a while now but I didn't want that to effect my work and alhamdulillah so far everything is under control. I managed to get all my orders done on time. This is the last handmade card order for this month and soon I'll be able to concentrate on other projects at hand. Yes! Yes! Yes! Can't wait to start on the other projects hehehe. :)

I'm not really good at making cards for the guys.....as you all know by now, most of my designs are very girlish hehehe. So it's always a bit difficult for me when I have to design a card that needs to look manly. My customer did request that the card should be in colours like black, red and gold colours so I combined all those three colours for this birthday card. I used my metallic gold card stock which I love so much and add in the other two colours to it. 

I decided to use ribbons and beads to decorate the card with. I love using this technique to mix and match a few types of ribbons together. And adding those beads to it too really does adds a special touch. The black polka dots were glued on the metallic gold card stock one by one. I marked the places where the dots should be and glued those paper polka dots on it. Frankly I love doing that.....just love looking at it when it all comes together.

My customer wanted me to use a similar pop up from the HB059 card design for this birthday card and so I did, but I changed the color combination to match the colours of the card and I also changed the wordings on the big pop up heart. I've also done another similar pop up pattern at this V022 card...you can click on the links at the card codes to view the cards :). So this is the 3rd time I've done this type of pop up and I realised how patient I need to be to glue all those tiny hearts on the pop up heart one by one. It took me hours to get it done. I've forgotten what feels like to do it since I haven't made this type of pop up in a very long time. All in all, I'm pretty happy with the design and hopefully my customer feels the same way too! ;)


Our 3rd Anniversary

AC007

About a month ago, I received an order to make a tri shutter card for my customer and in the beginning I thought I was not going to be able to pull if off because the idea for the card just never arrived when I wanted it to. It came at the very end. haha! That is usually the case with me. Ideas, don't come by whenever I want them to so I took quite a while to get this order done. But I was so happy that I managed to get it done on time :). 

My customer requested that the card be in red and black in color. She did liked the TOY002 tri shutter card that is red and black in color too but I wanted to try and do a different design for her instead. I don't have pattern papers in hand. Never bought them before. The only ones I have are the ones given to me by a friend and I prefer not to use them for my customers as I wish to use them for myself hehehe! So, for my customer I design the patterns on the card on my own simply by creating patterns using foam hearts, beads and shapes of hearts made by heart shape craft punch. The silver polka dots are actually paper dots made by a new craft punch I bought recently. I just love using it to make those polka dots patterns. hehe!

This card is definitely not something easy for me to make and it really did tested my patience and ability as a card maker. I need to practice more to make it better in future. :)


Purple hearts....

AC005

I received a few requests from a customer 3 months ago to design for her a wedding anniversary card and a birthday card for her hubby plus 2 more cards which she chose from the catalog here. I shall be posting the birthday card I made for her hubby soon. :)

I did have a hard time thinking of a new design to make for an anniversary card. She specifically wanted the card to be the tall narrow type like the tall cards I used to make way back in 2007. But I thought that particular size is a bit too small especially if I need to put wordings inside it. Even if I wanted to, the wordings would be too small for her to read it because of the small space inside. Therefore I chose this size which is a bit wider....thus giving me more space to decorate as well.

She requested the card to be in purple and white as the main color. So, I followed her request and added silver to give it some spark :). I love adding the purple heart beads and arranging them that way. It's the same technique I used for my love theme card I made before, but in this one I arranged it differently. I'm loving it so far. The design itself is pretty simple because I used an embossed paper for the base of the card. So I can't decorate too much on the card itself otherwise it will look too crowded. So I had to keep it simple. Not too overly decorated, especially since it's to be given to a guy. I'm so happy that my customer loved it! I love it too! :)

I LOVE YOU...

V023

Inspired by my beaded bookmark collection, I began to try out new possibilities of using those plastic beads for my new card collection and this is another one that I came up with after having so much fun using them for my latest Mother's day card :). 

I also experimented with the clear stamps I received from my dear friend in USA (Sandi Staley), quite a while back. She sent me the "i love you" and the "slim heart shape" clear stamps. I've been keeping them safely for too long......hehehe.....there are lots more of the clear stamps  in my collection that I've never even tried. Been thinking a lot about how to use them to decorate my cards. It's a challenge for people like me who rarely use this technique to decorate my cards. I just couldn't quite decide where to stamp them hehehe. That has always been the problem. I'm getting used to it.....need to experiment more :) It's actually quite fun once you get the hang of it!

Oh! I forgot to mention that this is the first time after a long long time that I am coming up with a new shape of card. For quite sometime now I've only been using the half A4 size cards. Long time ago back in 2007, I've done the long slim card version but that one was too slim to fit in a lot of words when we write our wishes in it. So I thought perhaps I would make it a little wider for more space inside to write what's on our mind. Also, this gives me more space to decorate since it's a little wider. :)

The pop up inside is a big red heart shape that is partially decorated with tiny gold hearts that was punched out using my new heart shape craft punch. I'm having so much fun with it by the way hehehe.....:) Then I stamped the "sweetheart" words in the middle of it using another clear stamp. I'm thinking of giving this card away for the May 2010 Blog Giveaway......what do you guys think? OK or NOT???? hehehhee!!


Happy Mother's Day....

MD008
This is a Mother's day card that I made for my Mom hehehehe.....It's her favorite color.....peach and orange colors :). I was trying to hide it from her so that it would be a surprise for her on Mother's day but she caught me taking photos of it this morning! Acckkkk! So the surprise is gone now huhuhuhu......Maybe I will make another one for her soon heheheheh....

As you can see at the close up photo, I've decorated the front of the card with plastic beads. I love those beads. I have been using them for my beaded bookmarks. I have plenty of them available and thought of trying out this new technique.....I've thought about using the beads this way for the cards for quite sometime now but never had the chance to do it yet. So I thought this is the perfect time to do it. There is nothing that complicated about this design....it's quite simple really. But as usual it's always time consuming because I like to decorate a lot of things on it...hehehehe. And this time around I used a new craft punch I just bought a couple of days ago which is the tiny heart shape craft punch. I'm always a fan of the heart shape craft punch. It's super cute and it can be used for a variety of card designs, so it's definitely worth the buy :).

For the pop up inside the card, I tried again to use the weaving technique to weave the hearts sides by side. So I had to glue the hearts on strips of thick pink paper in order for it to stand up straight.  It's just like what I did to my flowers in my previous pop up cards. I didn't want it the strips of  paper to bend. So it's important to use a slightly thicker paper for this technique. I added the tiny flower sequins of various colors on the hearts. It's the same flower sequins I used to decorate the front of the card. I love the shine it gives when it hits the light :).

Some people feel that for Mother's day cards, we shouldn't put too many heart shapes.....instead we should use more of flower motifs. But for me, I feel it's ok to use a lot of it because it helps to show our Mother how much we love and care about them. :) 

You are my heartbead ;-)


V013

This is another one of my new experiments! This time around it's with fine silver color wires and stringing it up with a mixture of colorful seed beads. I had a hard time figuring out how to go about it at first.....since I couldn't find a good tutorial video online that could teach me how to wrap the seeded wire around the heart.....so I had to use my own creativity instead...LOL! Which in this case took me a few days to find a solution and a few wires that was ruined in the process! hehehehe!

I used a red foam and cut it into the shape of a heart, to be the base where the seeded wire would hang on to.....I just love using the foam...it's so flexible...I also smeared the foam with silver glitters.....just love using those these days! The sparkle makes everything look fancy! :) I tried to glue the furry wire around the foam too.....to make it look neat around the edges of the heart....glad that worked well....I was afraid that it wouldn't work but luckily it did, simply by using UHU to make it stick. :)

There are no wordings made for this card......but if you wish to have any, I can make them for you and paste it on the inside of the card as well as the outside, which ever suits your fancy! :)

A bouquet.....

W002

I had a hard time designing this card.....it was really difficult to make...half way through I almost gave up hehhehehe............ the bouquet of flowers took a lot of my time because of the sewing. I sew the beads and sequins on the white paper....and later pasted the white paper with two other layers of paper. I love the lace at the top and bottom of the card....the lace was cut out from a bigger piece of lace.....I only wanted that part of the lace for this design so I had to cut it out from the original lace itself.....and that was not an easy task to do either hehehe.......the butterfly were traced on paper using a template and later cut out by hand....

I think this card would be suitable to be given to a bride and groom on their wedding day.....to wish them all the best in their future as husband and wife.... The card is left blank for writing on personal wishes.....and comes with a soft pink handmade envelope...

A beaded christmas tree

CD002 (NOT FOR SALE)

Another Christmas card on my list! :) So excited about it! I've always wanted to do a Christmas tree card with some beads and sequins decorated on it...to add some glitters to it too. Yet again another simple design I made using an A6 size red card to have some contrast on the green tree and also some Christmas spirit to it! I sew on the tree the beads and sequins, LOVE doing that! Ever since I found a way of doing it on paper, I do attempt to use this technique whenever I find it being suitable for a particular design. I just love the effect it gives to the card.

I decorated the background with silver dots to symbolize the snow falling down on the decorated tree. It gives a feeling of cold breeze (the snow) and hotness (the red card) to it! hehehe! The tree itself was made by using two tones of green, lined with some little space between them to create a patterned design. Recently I just love doing that...lining up strips of different colored paper side by side to create a patterned design...kinda meditative to me I suppose to do that hehehe. :D
The card could just be left blank or have a simple Christmas message inside. I already have in mind who to give this special Christmas card to
...ooooh can't wait!!!! :D


Featured Post

How to make two tone tear drop shape quilling flowers

We are coming close to mid February and I'm blogging about something that I did last January! LOL! It's been a month sin...