Showing posts with label Quilled teddy bears. Show all posts

Big brown quilling teddy bears


These quilling teddy bears were created in October this year when I was high on making my quilling teddy bear tutorial. After making those small colourful quilling teddy bears, I just had to try to redo my old big brown quilling teddy bears that I created years ago. 

The old design was special in its own way and I only made minor changes to it to give it a new life. I must say I adore the new one more as it has some nice facial makeover haha! 

I pasted these big brown quilling teddy bears on a gold die-cut card stock as they are flying to USA to see my good friend there. I didn't want the quilling teddy bears to get spoiled in the flight so I thought this is a good way to get them there in good condition. Plus, my friend can easily use them as decorations on her handmade cards etc if she wishes. She has never done quilling before and I was afraid that she might not know how to handle these quilling pieces. So by gluing them for her on the die-cuts, it would be easy for her to handle them :).

She loves gold and brown colours a lot! Most of her cards are made in those colour combinations. I've received many of her cards made in those colours and I really adore them a lot. Whenever I make cards in those colours, I would always think of her :). I really hope they arrive there safely and make her happy! :)

How to make a two tone quilling teddy bear


I've been thinking of making a video tutorial for a quilling teddy bear this year but I wanted the design to be different from the quilling teddy bear I've made years ago. So after taking such a long time to practice making and redesigning my quilling teddy bear for the past few weeks, I'm finally satisfied with the new design.

As you all know I have made quilling teddy bears before way back in 2010. Back then, the quilling teddy bears that I made were a bit bigger and mostly were brown in colour. Later after that I did make smaller ones but they were simpler, with loose coils and had faces that didn't even have any eyes or lips.

But for today's design, although they are small, but it's combination of the big and small quilling teddy bears.  Also, I've added something new to my quilling teddy bear design especially for the face and body. If you take the time to look at my older quilling teddy bear designs then you will be able to see the differences between the old and new. 

A lot of people have been asking me to make a video tutorial for my quilling teddy bears over the years but I never got around to doing it till now. So I hope that this video tutorial will make a lot of people happy :).

As promised, below are the measurements for the two tone quilling teddy bear:
I am using 80gsm quilling papers to make my two tone quilling teddy bear. The quilling papers were made by cutting up an A4 colour paper using a mini paper shredder. The size of each strip of paper is 3mm x 297mm.

1. For the face:
    - 5 quilling strips
    - Circle number 7

2. For the body:
    - 11 quilling strips (5 strips of soft cream colour + 6 strips of any colour).
    - Circle number 11

3. For the hands and legs:
   - 1/2 strip of any colour + 1/4 strip of soft cream colour.
   - Circle number 5

4. For the ears:
    - 1/4 strip of any colour + 1/4 strip of soft cream colour.
    - Circle number 3

5. For the cheeks and nose:
    - 1 strips of soft cream colour, cut in half and joined together + 1/2 of the 1/4 strip of black colour.
    - No need to use a circle template for this. Just roll the strips to make a tight coil.

6. For the eyes:
    - 1/2 of the 1/4 strip of black colour for each eye.
    - No need to use a circle template for this. Just roll the strips to make a tight coil.
    - Paste on top of each eye a tiny white paper dot.
    - Then finish it by pasting on top of the white paper dot with an even tinier black paper dot.
    - The tiny dots were made by using a Martha Stewart craft punch.

7. For the lips:
    - I hand cut the shape of the lips using a craft knife.
 
Do enjoy watching and learning how to make the two tone quilling teddy bear from my video tutorial below. Have fun quilling!! ;)


Stamping and quilling

JFY005

I had been busy during the fasting month cleaning up my studio. It looked so darn messy for the past few months. I could barely walk around it as there were just too many stuff lying on the floor, on the table...there were just too many stuff everywhere! Such a mess. I wonder how I was able to work in such a condition sometimes. One day, I just couldn't take it anymore and had to get it all cleaned up and organized. Finally after a few days, I managed to get it done and was surprised to find things that I thought were lost.....well, I thought they were lost....but actually there were in the same studio....just hidden under loads of stuff that I had been piling up inside.

While I was cleaning the room and organizing some of my craft products, I felt a little guilty because I just realised that I have some craft products that I haven't even used. I bought some over the years and some that were given to me as gifts but I never got to use them. All kept nicely hidden in boxes and drawers. All forgotten. I guess it has something to do with my little obsession with quilling that took over everything. But now I think I should try to combine quilling with the other techniques or at least try to use those products that I bought so that it would not get spoiled over the years. 

That's how this new card design came about....coz I was thinking of using up all my rubber stamps and ink pads that I have in my collection. This card is a mini one...just a small cute card. I love making small cards these days. Perhaps coz it's faster to get them done...hehehe! So this is just a start.....to get warmed up :). I made a few of this card design to keep as stock. I need to make more stock for other occasions as well. Hope to keep this high spirit up for at least till the end of the year. So much to get done and experiment with! >.< wooohooooo!!


13


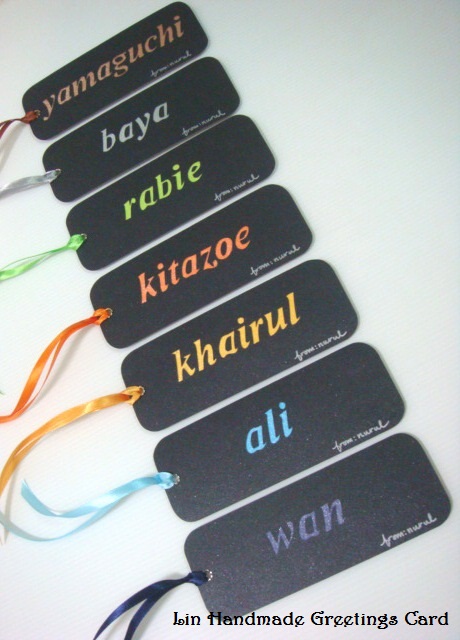
It's been while since I last made any bookmarks such as these.....especially with names engraved at the back of it. It's rather time consuming and takes a lot of patience to make. I still have two more of these to make for another customer. Hope to be able to blog about that one in a day or two. :) Sorry the photos are not that clear......took them in a rush...but you can view them up close at the slide show below this post.

My customer ordered 13 bookmarks for her colleagues and one for herself. She's moving to another company soon so these bookmarks are like farewell gifts for her dear colleagues. She was interested in two of my bookmark designs.....one was the BM006 and the other was the BM008. So the bookmarks were done using those designs but the colours vary from one another. I've never had to do so many colours at the same time! Phew! Luckily I had all the colours of paper and ribbons to make these bookmarks hehe! 


First time for me to do the name in two colours.....usually it's just one single colour. It was and interesting try since my customer wanted the colour for her own bookmark to be in pink and purple. :)


Lots of green and pink!

V054


Watch this video to see how the hearts pops up inside the card  ;)
(First time ever for me to take a video of my pop up card!! So exciting!! hehe!)


Look familiar?? Yes, this design is actually a design I made sometime ago, made it last year to be exact. But the colour combination was different when I did the HB085 birthday card. And the pop up inside was different as well. You can view it at the link --> HERE. My customer wanted me to change the colours to a combination of pink and green so that's why you see there are a lot of pinks and greens here :). And for the pop up, she was interested in something like HB039, but I didn't do exactly like that and changed the pop up to make it more suitable for this design.

It took me such a long long long time to get this card done for her. She had to wait for so many months! She is such a nice and patient customer. So grateful for that :). I'm so happy that I finally get it done and also made some bookmarks for her too, which she requested especially for her and her bf ;). You can view the bookmarks below.....it's a design I've done before...you can view it at the link here ---> BM007 , but since I ran out of dark brown paper, I had to substitute it with black instead but still I added the metallic brown paper for the engraved name behind the bookmark. So happy that she loved what I made for her ;). I'm so happy too! hehehehe!


Red and green teddy bears


BM012


 BM007

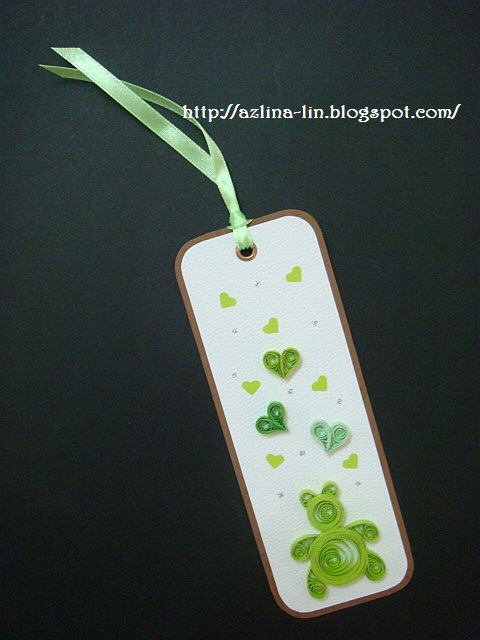
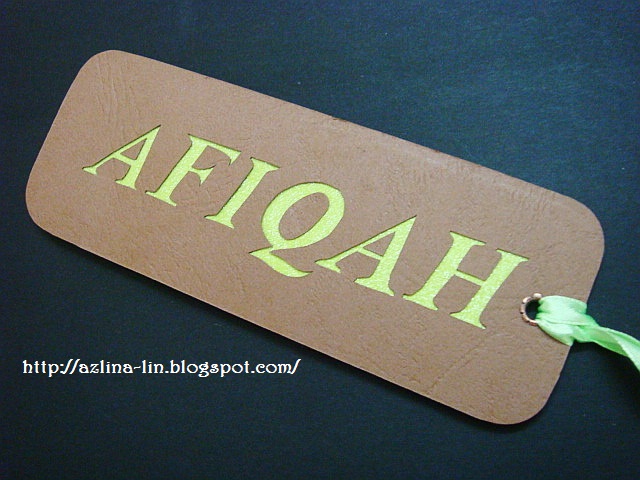
Red and green quilled heart and teddy bear bookmarks! Requested by a regular customer of mine who wanted these bookmarks to be in those colors with names hand-carved behind the bookmarks. :)

The green teddy bear is a design I've made before, so it's not something new. But the red one is new :). I uploaded photos of the green one anyways because the wordings behind the bookmark is obviously different and I just love how it looks hehee.

The size of the bookmark is standard in size but if you wish to write longer names, then the length of the bookmark would be longer otherwise it won't be able to fit in all the letters. You can view other samples of this type of bookmarks with names at the link HERE. :) 


Tool box 3


I've just finished making another batch of quilled items for my 3rd tool box yesterday. I think this will be the last tool box I'll be making because I need to concentrate on other projects in the next few months. Making these quilled items for the tool box is very very time consuming as you all know. And if I were to make another one, it will probably be for me hehe! Coz I would like one for myself as well haha! :D

It's a big relief to be able to get this tool box done and I am really in need of a holiday. I will be taking one soon next week and I'm just counting the days now. Been working non stop for two months straight and it's nice to take a long break for a while. Want to go hunt for new supplies as well. Visit new craft stores and feast my eyes with beautiful things hehe! Do fun stuff with friends too! :D
So I will be away till 4th of July and will resume back to work on the 5th. Have a good weekend everyone! ;)

Turquoise, lime green and orange teddy bears

BM006


BM007


BM008


Mini quilled teddy bears in turquoise, lime green and orange color! Yup! Requests from a new customer who wanted them in his favourite color and also in his sister's favourite colors too.

I was also requested to make some quilled alphabets of their names on the bookmark itself but I was a bit reluctant to do it since the bookmark is quite small unlike a card that has more space on it. Furthermore, my quilling skills in making those small alphabets are not up to the standard yet! haha! So I suggested to him that I do those names in the way I'm good at which is by carving out the alphabets and lining them with some thin fabric and color paper. I love how it all turned out in the end. :)

You can view some carving techniques I've done before on bookmarks at the links HERE, HERE and HERE :).

This is the first time I decorated both sides of the bookmark. Normally I would just decorate them on one side only.....but since there isn't much space for the design and the name, so I thought this would be a much better solution to combine both on one bookmark. I'm so glad that my customer loved them so much! :) 


Tool box 2

 
Alhamdulillah......it's all done! I've managed to get all the quilled shapes done today and it's ready to be posted soon. :) I just hope that my customer is happy with it hehehe. :)

I got this order a while back but had trouble getting it done on time due to my ill health. Been sick for quite some time now. One health issue after another. Currently it's fever, flu and sore throat! :(

What I love most about this tool box is the lady bugs hehehe.....it's a little smaller than the one I did before for my first tool box.....and the best thing is, I glued black beads on it as it's dots. I love that effect on the lady bug. :) And this is also the first time I made butterflies like this. I mean the middle part of the butterfly....a simple technique and I love it...simple to do and cute :). The ones I did before were too time consuming...hehe.

Here's the list of what's in the tool box:

Lady bugs - 50 pieces
Teddy bears - 21 pieces (assorted colors)
Small butterflies - 90 pieces (assorted colors)
Big butterflies - 21 pieces (assorted colors)
 Leaves - 500 pieces (assorted colors)
 Roses - 150 pieces (assorted colors)


Featured Post

How to make two tone tear drop shape quilling flowers

We are coming close to mid February and I'm blogging about something that I did last January! LOL! It's been a month sin...