Showing posts with label Craft tools. Show all posts

Making quilling papers with the pasta machine - REVIEW


Hello everyone!
Once again I'm experimenting with a new tool that could help me with my quilling crafting. This is something that I've been wanting to try since last year. I saw a few videos on YouTube that shared how we can make quilling papers using a pasta machine or a pasta maker, whatever you'd like to call it. When I first saw the video I was really shocked to see how easy it was for them to cut an A4 paper to make quilling papers of different sizes with the machine. It was really exciting to see the demo and I wished I could do the same.

I only have a manual paper shredder and it only cuts 3mm paper strips. If I wanted other sizes, I would have to cut the paper with a craft knife. I do wish that there is a machine that could cut other sizes as well. That's why I wanted to try the pasta machine. So I went to searched for it in town and found a cheap one that I could try at home.  I wish there was a better quality one here but I couldn't find one. In this post, I just want to do a little review on the product and share with everyone my experience using it. 

In the beginning, I did have problems using the pasta machine as it didn't cut well and the paper strips didn't come out straight. The edges were not clean cut either. So I was a little frustrated. But I didn't give up and tried to figure out what I did wrong. After numerous tries and lots of spoiled papers, I managed to cut the paper straight enough and less paper went in the dust bin. I needed to be patient went running the paper through the machine, must slowly crank the handle. I cut the A4 paper in half and run it through one piece at a time. The best weight of paper to use is 80gsm. The thickest I've tried with the machine is 120gsm.


The pasta machine that I bought could only cut 2mm and 5mm paper strips. I was happy about that especially about the 2mm strips because I've never used a paper strip that small before. I'm used to 5mm already, and I liked it too.

As you can see from the photos above, I really love making those leaves using the 2mm strips. I could also make it look like a 3D leaf and yet it doesn't look so bulky. That's what I love about it! Awesome!


I also made small little flowers with the 2mm strips. I really love them! They will compliment the bigger flowers really well. I've always wanted to have different quilling paper sizes for different purposes and now I can make it happen because of this machine.


I cut the 5mm paper strips and made bigger sized flowers with them. It's nice to make flowers with different size strips. I'm so used to using 3mm paper strips for so many years so it was nice to be able to cut a lot of 5mm strips at one go and work with them.


Another thing that you can do with the pasta machine is use it to emboss your cards or papers. But the emboss is not that deep which I actually like because sometimes there are times when I use the Big Shot machine to emboss, it pressed the embossing folders too hard and tears the paper. So the pasta machine does not tear the paper at all. Love it!

All in all, I don't regret buying this machine but I don't necessarily recommend it to anyone especially if you don't have the patience and don't like rough edges on the paper strips. The machine has helped me cut the 2mm  and 5mm strips that I wanted even though it does have some rough edges. I really don't mind it that much because I'm used to the rough edges already. I've been making quilling cards using shredded quilling papers with rough edges for 10 years now and it has not stopped me from being creative. Hope to make more interesting quilling shapes with the new quilling papers!

Do check out the video below to see how I use the pasta machine. Thank you!

CRAFT PRODUCT REVIEW FOR IN LOVE ARTS SHOP


Hello everyone!
I'm back today with a craft product review for In Love Arts Shop. Oh my God, can't tell you how much I love their die cuts and quilling papers! I was over the moon with them! Really enjoyed making handmade cards with them.

If you check out the video you'll be able to view some of the handmade cards I managed to come up with recently. Will blog more about them soon! 

I want to explore and experiment more using the die cuts but the quilling papers are all finished! Yikes! Wish I could get more next time from them. The quilling papers are quite thick unlike my own quilling papers. Maybe theirs is about 90 or 100 gsm. I'm just guessing since the weight of the paper is not stated on the packaging. Mine is only 80gsm.

I want to do a handmade card video tutorial, so please check out the video and let me know which handmade card you like the best from the video. I'll do a tutorial for the most requested card. It will be my fist time making a tutorial for a handmade card and I'm pretty excited about that. LOL!

Thank you for watching my video! ;)

Alternatives for quilling comb


A lot of my readers have been asking me about the quilling comb. Many have expressed their interest in purchasing the product from me but unfortunately I no longer sell the product because I think that we can use an alternative tool to do the combing technique just by using a hair comb. It's cheaper! ;)

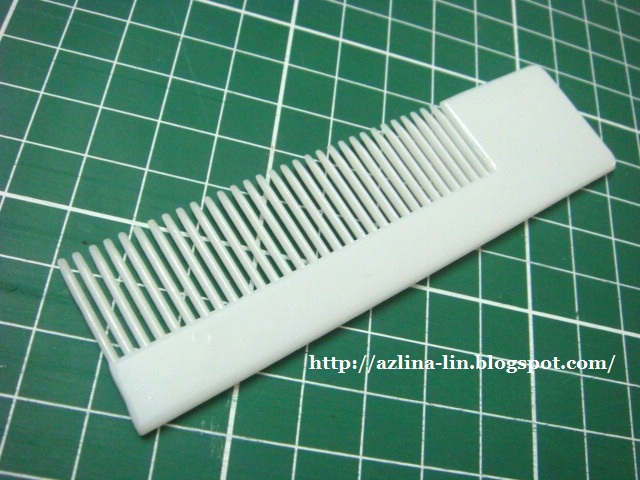
Below you can see the various types of hair comb that I am currently using for the combing technique. I used each of them for making different types of flowers or leaves. You can turn the hair comb into a quilling comb just by cutting off the end part of the comb using a small DIY hand saw. See below how I've changed the hair combs into quilling combs and view in the video the basics of how you can use the altered hair combs for the combing technique. Do watch till the end of the video because I'll be showing you how to make the  basic husking flower at the end of it! So do be patient and watch the whole video ya! Hehe! TQ!


I would say that this lice hair comb is my favourite! It's very easy to hold when doing the combing technique and I can do cascading loops with it and also the tiny loops petals as well with it. Love the small pins it has and the gap between the pins are really close together. But if I wish to make the loops look further apart from each other, I just skip a few pins to get bigger loops. You can only use one side of the comb. The other side has pins that are just too small and the gaps are too narrow for the quilling paper to go through. You can use this hair comb to make the cascading loop flower, the tiny loops flower and also the husking flower.


This hair comb is "ok la" for me hihihihi. Not my personal favourite but since it's bigger in size, it's quite comfortable to hold. The pins are quite big, thus producing bigger loops that sometimes are not to my liking.  This hair comb is not suitable for making the tiny loops flower though.  I've tested it and it didn't look that nice. But it's ok for making the cascading loops flower and husking flower :).


Special offer for quilling starter pack!!!

SOLD OUT!!!!!!!!! 
(Sorry, stock for quilling starter pack are all sold out, will restock soon)
Hello everyone! I'm doing a special offer for quilling beginners. I'm offering a special price for quilling products you see at the photo above. This is so that a lot more people can enjoy the pleasures of quilling! :) I am not including glue in this pack because you can get the glue easily at any stationery stores in your area compared to the other items. :)

The price for the quilling starter pack is RM25.50.....but I'm now offering it with a special price which is only RM23.00 per pack!!! See below for full details on the price and cost of delivery within Malaysia.


ITEMS IN QUILLING STARTER PACK:
- 1 SLOTTED QUILLING TOOL
- 5 PACKS OF MULTICOLOUR SHREDDED QUILLING PAPER (25 COLORS ALTOGETHER)
  *Check the multicolour shredded quilling paper at the link below:
http://azlina-lin.blogspot.com/2011/07/shredded-quilling-paper.html
- 1 MINI CIRCLE TEMPLATE


Slotted paper quilling tool


Interested in a slotted paper quilling tool? Well, I have good news for everyone out there who are fans of quilling! I'm  now selling this quilling tool! :) It's about 12cm in length, with a brass needle slot and a plastic blue marble like pattern handle.

Honestly, I really love this quilling tool.!! It's definitely my favourite quilling tool now amongst my collection of quilling tools. It's so comfortable to use because of the long plastic handle and I really love the slotted part that is quite long in length compared to the one I bought when I first started to learn how to quill. It just makes quilling big coils of quilling paper a lot easier, in my personal opinion. The tight gap of the slot makes it easy for the quilling paper to stick and coil around it. No slips at all. Love it! :) I even decorated the quilling tool with a silver lining dark blue ribbon around the handle just to make it look a little prettier hehehe.

Below is a video tutorial that I made on how I use this slotted quilling tool. Do check it out ;)


So if you are interested to get this lovely quilling tool, do email me for details on how to purchase them at my email address: inaabdul_21@yahoo.com


Self-cling rubber stamps


Don't you just love a good bargain? Well I do! ;) And these rubber stamps are  really a great bargain. The first time I found out about this type of rubber stamps, was when my craft buddy Miyyah gave them to me as a gift. I was super excited about them. I think I've blogged about it as well before. You can have a sneak peak of it at the link HERE. The one she gave me was a sheet of rubber stamps that mostly  had designs of wishes/wordings. It didn't have any ink pads or rubber stamp holder in the set. But this particular one that I bought had them all included in the set. I love it coz now I have the plastic holder for me to use to stick the rubber stamps on it, which makes it easier for me to stamp with. :)

They have a variety of designs to choose from and I wish I could buy them all! LOL! :D Well, I just might do that actually hahaa.....since the price is quite reasonable compared to the other brands of rubber stamps that you can get at the craft stores which  are so highly priced. Of course they are expensive because of the high quality. But then, not all of us can afford it right? ;) 

These rubber stamps are quite durable. They are not fragile and very easy to use. They stamp well too. Love them!

Lately I think I've been buying too many stuff for my card making activities. Even though I do think I should slow down on the buying and concentrate on the making, I can't help but buy them because they are such a good bargain...hehe! Gotta get them when they are still available in the market....coz once they are sold out, there's no telling when the supplier is going to restock them so, I gotta get them when I can. :).

Not sure yet what I'll do with these rubber stamps......but I sure do hope I'll get to use them this year! :D We shall see! ;)


Multi function tool


I was searching for this acne + blackhead extractor tool at a few places in Alor Setar but I finally got a good one when I was in KL recently. I bought this at the Mydin's Store in Jalan Tunku Abdul Rahman. It only costs RM3.90 and not only did I get this tool, but I also got the eyebrows plucker together with it. A good bargain! You can use the eyebrows plucker to pick up small craft items. It's also great when you need to glue small pieces of paper and other small craft objects onto paper/card.

Yes! You can actually use these tools for crafting! Yup! Amazing isn't it? You can actually use the sharp end of the acne extractor tool that looks like a needle for the quilling technique and also for making holes on paper. The needle is very very sharp and it can poke through the paper really well and it makes a very neat and small puncture on the paper too. Once you have punctured the paper with the sharp needle tool, you can sew a thread through those holes. Cool ya? Do view the photos below for examples on how you can use the needle for making holes and sewing thread onto paper.


Note: These small holes made by the sharp needle from the acne extractor can only fit in fine thread like the  dark blue thread you see above. For thicker thread like the ones used for crochet or cross stitch, you would have to poke the paper using a bigger needle to make bigger holes on the paper. :)

You can also use the sharp needle from the acne extractor to QUILL! Yes! I've tried it and it works wonderfully! I love it! See how I do it from the photos below :).


I simply love how the petals of the flower has a small hole formed inside it. If you use a slotted tool, you won't  get that effect, and if you use a finer needle, the hole inside the petal will be much much smaller as well. So now, for those who cannot afford to buy original quilling tools, I hope you can use this tool as an alternative to quill :). Using a bamboo skewer may not be a favourite for some because it's easily breakable if you are not gentle with it. So using this acne extractor can be your solution. The choice is in your hands :). All the best!!


Tool box


I'm so not in the mood right now to quill.......eventhough I have a lot of cards waiting for me to decorate them with quilled flowers, butterflies and etc etc. I'm practically forcing myself to work right now. That's not good. Not sure what's wrong with me lately. The mood is just not there. Have I lost it somewhere? Don't know..... :(

I just wanted to share with everyone what I would usually do with those quilled shapes I've made. I kept them all in this tool box! I even keep those rejected quilled shapes  in this tool box. I didn't buy this tool box at a craft store. I bought it at a supermarket.....found it at the hardware department. There are a lot different types of tool box available in the market. But I like this one. It looks like a plastic folder except it has lots of sections in it. I bought a few of them so that I can keep my quilled shapes in it. I love it, it's so convenient!

Before I bought this tool box, I used to keep my quilled shapes in small plastic containers. All different types of  plastic food containers......you know, like margarine containers, yogurt containers, etc etc etc. hehehehe.....but they were all not easy to arrange since they were all in different shapes and sizes. So it doesn't look neat when I keep them away after work. So I guess that's why I decided to get me those tool box a few months back.....so that I can keep them stacked up nicely on the table and saves me a lot of space too. It looks so organized! hehehe.... :)


Needle quilling tool


I own two types of quilling tools which I bought early this year. But I have only been using one of them (the slotted quilling tool - silver in color)  because it's much more easier to handle. I even made my own quilling tool using a bamboo skewer which I have been using for almost all of my quilling projects so far because it's so comfortable to hold and super easy to roll the strips of paper with it.

I've never tried using the needle tool like the one you see above (the one with the wooden handle), because I never had the patience to try it and didn't quite get it how to use it even though I've seen the video tutorials. All this time I kept thinking that it's too difficult to use. So I never used it for any of my projects until the day I went to the quilling get together when I saw with my own eyes how the other quillers used it. It looks so easy!

This is how I use my needle quilling tool. I made a video of how I use my needle quilling tool. Different people may have different styles of using it, but this is how I do it ;). Do check it out. :)


Once I've tried it, I could see the difference in the coils I've made. The paper coils are so much neater than the coils I made using the slotted quilling tool. I noticed that if I use the slotted quilling tool, there will be a  small crease in the center of the coil because the end of the paper strip is inserted at the slot thus creating a small crease there. If I use a needle quilling tool, there won't be any creases at all. I really love the effect I get using the needle quilling tool. It's especially wonderful when you are making quilled circles. The circles looks so much neater.

I feel that each quilling tool can be used for different types of quilling shapes. For me, if I want to make quilled circles from now onwards, I would only use the needle quilling tool as the quilled circles will look so much more neater and prettier. But for making quilled roses, the slotted quilling tools is much more suitable to use to roll the cut out shapes. It all depends also on which quilling tool you are comfortable with.  As for me, these are my preference.

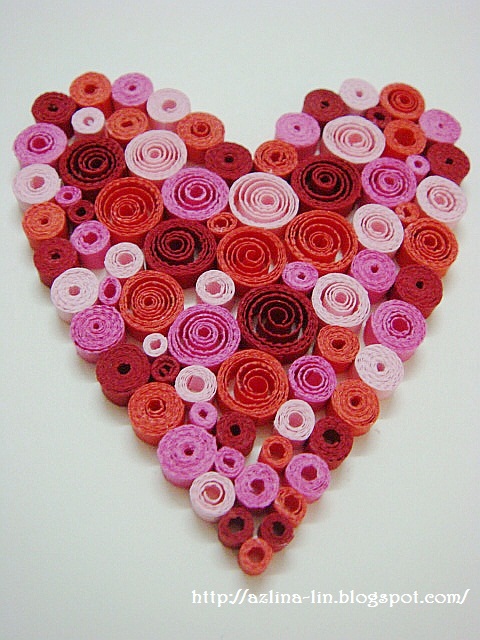
You can see the differences of the quilled circles from the photos of the quilled hearts I made here. Can you spot the differences?? ;)

Quilled circles made using the needle quilling tool


Quilled circles made using the slotted quilling tool (made from bamboo skewer)


Handmade bamboo stick quilling tool

I've been receiving a lot of inquiries regarding quilling tools ever since I started experimenting with the quilling technique. Many of my readers inquired from me about where they can buy them, how much they cost and etc etc etc.  For those living in Malaysia, it is pretty difficult for us to get these quilling tools as most  of these quilling tools are sold in Kuala Lumpur. A lot of people are not able to travel and go to craft stores  in Kuala Lumpur to purchase these tools themselves. Sometimes the quilling tools itself is out of stock. 

So, one day I decided to try and make my own handmade slotted quilling tool. For those who are not aware of the different types of quilling tools, there are two types that I know of. One is the slotted type and the other is the needle type quilling tool. So I'm gonna be teaching you how to make the slotted type because I think this one is a much easier quilling tool to use whenever I do my quilling.  

I made this simple tutorial for a paper article. I hope it gets accepted. :) The article is in Malay language.....so I won't be publishing it here, but I'm sharing with you some of the photos I submitted for the article. The article is about a simple tutorial on how to decorate your paper bookmark with quilling flowers and leaves. I also showed how to make the quilling tool using a bamboo skewer that we all use to make Satay with. :)


As you can see from the photo above, I start making the quilling tool by cutting off the sharp end of the bamboo skewer using a sharp razor blade. Then I  carefully made a straight cut at the center of it to make a space for the slot.


Do be careful when cutting it as you can break it if you are not careful and gentle with it. The cut made by the razor blade is quite narrow and perhaps too narrow to slide a paper strip between it. So take a metal ruler and try to widen the slot by forcing it between the center of the slot as per photo above. You will get the result as the photo you see above if you put the ruler in between it like so.


Now you can start quilling the paper strips using the bamboo quilling tool. I personally love using this bamboo quilling tool to make my quilled creations. This is because the length of the tool is very comfortable for me to handle compared to the small sized quilling tool I bought at the craft store. It is so small and short in length which makes it difficult for me to hold it when I start to quill the paper. So this bamboo quilling tool is my favourite quilling tool to use these days! :)


As you can see from the photo above, these are the quilled flowers and leaves I made using the bamboo quilling tool. The result you get from using a cheap bamboo skewer is the same as you'll get when you use an expensive quilling tool. I wish I had figured out how to make this earlier.....could have saved my money from buying the quilling tool! hehehe!


Here is the simple quilled bookmark I made for the paper article. It's meant to teach school kids how to make a simple decoration on a paper bookmark. School teachers can really benefit from this article......so I hope that it gets accepted! For those out there who are teachers....you can teach your students how to make their own quilling tool and start quilling! All the best!! :)

Featured Post

How to make two tone tear drop shape quilling flowers

We are coming close to mid February and I'm blogging about something that I did last January! LOL! It's been a month sin...