Showing posts with label Half A4 sized cards. Show all posts

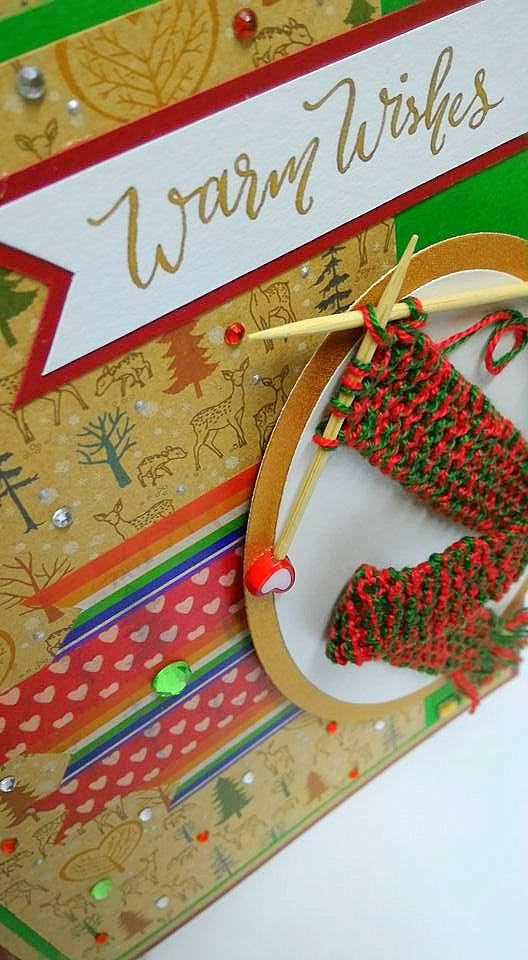
Miniature hand knitted scarf on Christmas card


Hello again! 
Today is the day! It's Christmas day! When people are busy celebrating Christmas and enjoying their holidays, here I am writing about my second Christmas card design for 2017. This is a card made for a dear friend of mine. I planned to post it before Christmas just like the other card I made, but unfortunately, it had to be postponed. Boohooohooo!! So sad!

I made something for my friend and I plan to post it along with this card. Until that gift is ready, I can't post it yet. So I'm pretty stressed out here trying my level best to get it done before the year is over. It could be a new year's gift as well, so I'm working as fast as I could to get it all done on time. 


I really enjoyed making this miniature scarf for the card. It's just so cute. I think I made so many of them in the beginning when I was experimenting with the measurements. I had to make sure they would fit nicely on the card. In the end, I think I made it  a bit too long for the card. To be honest, it took me longer to make the scarf compared to making the miniature sweater. Next time I'll make the scarf shorter. Lesson learned! LOL! Since it's for a Christmas card, I used a dark green and red yarn for the scarf. It's a lot harder to knit with such a small yarn but with lots of practice, it gets easier.

One thing for sure.....knitting takes such a LONG time to finish. It takes FOREVER!! hahahah!! So although the design is simple, it sure is time consuming. Since I myself am just a beginner, it takes much longer to get the job done compared to experts hahaha.


As always, every time I want to write the sentiment on the card, I will use my Speedball calligraphy pen and my favourite ink from Dr Ph Martin. I just love how smooth the ink is. Although my writing is not that great, somehow the pen makes it look good...LOL!! Believe me, the pen sure do wonders! Come to think of it, I need to get more colours for the ink. I keep using the same gold colour for my cards, over and over again. 


I really love the knitting needles that I made for knitting the scarf. Especially because of the heart shape beads that I used for them. I don't have a lot of them in my collection. Just a few left! I bought them years ago when I was staying in Kuala Lumpur. I see a lot of people who makes miniature knitted scarf for cards would use round beads like the ones I used for the miniature hand knitted sweaters. But for this one I just had to use the heart shape ones, for a couple of reasons. One because they match the colour of the scarf and second because the person who is receiving it loves hearts so much. ❤❤❤


Pop up 3 layers birthday cake card

HB138

First card for August! It just so happens that on the 1st of August, my Mom and I celebrated a dear old friend's birthday. So for that I made a card for the birthday girl who turned 62 this year. I still can't believe she's 62! Wow! Feeling a little old myself right now! We're 20 years apart! Known her since I was in kindergarten. Always thought that she was the prettiest school teacher at the school where my Mom and Dad taught in.

Anyways...back to the card design hahaha....as always, I would be rushing like a mad woman trying to get the card done on time as I was extremely busy at the time with orders. In the midst of figuring out what to do....I realised that she has never received a pop up card from me before. So, I thought, it would be a good idea for her to get one from me this time around. The fastest and easiest pop up for me to do when I have very little time is that pop up 3 layers or tiers birthday cake I bought from MR. DIY two years ago. I bought quite a few of them so that I can use in times when I am in a hurry haha! I love that the cake comes with numbers that we can use to show how old the person is. It's a diy pop up cake...you would have to assemble it yourself. Luckily for me since I know how to assemble that type of pop up, it was easy peasy for me to do.


Usually it would take me about 5 to 6 times to write Happy Birthday with the calligraphy pen before I can get it right. I was surprised I only did it once this time and was happy with it! LUCKY ME!! Saved my ink! LOL!!!

Do check out the video below and see how the card pops up!! Thank you!!


Tri-shutter birthday card with pop up cake

HB137

How long has it been since I last made a tri-shutter card. It's been ages I'll bet! Oh how I miss making it so much! So much so that when I had a request to make a pop up cake birthday card, I couldn't help but use a tri-shutter card stock as the base. 

I've never made a tri-shutter card with a pop up cake inside it before. Big pop up heart shapes.... I've done that before in tri-shutters....but never a pop up cake in tri-shutters. I just had to give it a go! The pop up cake that I did was a 3 layer birthday cake...so it was a bit big for the space inside a tri-shutter card. If it was just a 1 or 2 layers, it would have been easier. But since the request was for a 3 layers cake (because I've done a few before on other birthday cards ....hence the request 😁).....so I did my best to fit them in. The pop up cake is not die cut by the way. It was done from scratch....hand cut....by yours truly 😀....not something that was easy to do. Painstakingly hand cut and pasted inside the card.

Die cuts pattern from Die-Namics Prima Donna petals seem to be a favourite with me lately. I just love using them for decorations on my handmade cards. They turn out beautiful every time because they are die cuts. Never have to worry if I didn't cut the petals in uniform shapes and sizes. They will always look the same. That's the beauty of die cuts! Yay! The only thing different will be the types of papers used to make the flowers. You could always change the colours to make them stand out and fit any card design. I personally love to use pattern papers nowadays as opposed to plain ones. Because the pattern papers gives them character.

The birthday wish on the card was done with a calligraphy pen. I just love using that gold ink! I'm obsessed with it really! It's just so pretty as it looks embossed when it's dry. Nothing beats writing it yourself. Even if it's not perfect....it's yours. So I'm happy with it. It took me a long time to get it right. It's normal. Because I'm no expert. Experts usually get it right the first time, but it usually takes me 5 to 6 times to be happy with it hahahaha.....yes, I do waste the ink a bit.....but that's how you get your practice. Otherwise you'll never learn.

This birthday card was actually made for a very special lady who is currently struggling with her health right now. I do hope that when she receives this card, it will cheer her  up and make her feel happy. I also hope that she will recover soon from all her complications. May Allah bless her always with good health. 

Do check out my video below too. You'll be able to see how the tri-shutter card looks as it opens and closes. Hope you'll enjoy it!! :)


My second pop up mosque Raya card in 2017

HR031

Hello again everyone.....so how was your raya/eid celebration this year? Mine was good, hope yours were good as well! Had lots of goodies to eat after one month of fasting. Luckily I didn't over do it and gained back all the pounds that I've lost! Phew! Eat in moderation ok guys! 😀😀😀

So here they are, as I mentioned before in my previous post....the 5 pieces of pop up mosque raya cards that I made for the same customer who ordered those small ketupat ribbon raya cards. I think I was much more sad to see these go compared to the other raya card design. Perhaps because the papers that I used to make the flowers are no longer available. All used up for the 5 cards. I didn't even have a sample of the card in my collection now huhuhuhu.....it's just a coincidence that the papers used were just enough for that amount of card, not more, not less.


I started off by making the flowers first. I had to make sure there was enough of them for all 5 cards, otherwise I would have to choose other type of pattern papers for the flowers. After that was settled, then I can start thinking of the other parts of the design such as the sentiments on the card, pop up mosque etc etc.

The die cut flowers were fun to make. It's been a while since I last used the dies....I think the last time I used them was for the Happy New Year card. At first I thought of using the same gold ink that I used for the other raya card.....but unfortunately it was not suitable at all for this design because of the colour combination makes the card look dull. So I had to use the bright orange watercolour instead. So instead of using the calligraphy pen, I had to use the watercolour brush. There are times when using the brush can be challenging especially if you don't have a steady hand. So again, because of that a lot of mistakes were made and I had to make quite a lot of the sentiments so that I can choose the best ones for the 5 raya cards.


You must be wondering why I made the pop up mosque this way instead of making the pop up look like a square building just like the mini mosque I made before. Well, one thing I've learned when making those mini pop up mosque was that if I wanted to make that type of pop up mosque I would need a bigger card so that there is ample space inside the card for people to write their wishes in it. So to get that bigger space, the pop up mosque had to be done this way instead.

If you are also wondering how I made those mosques, well, they were cut by hand as well using the craft knife. Same goes with the green bushes as you can see I had to cut them up by hand as well. It was time consuming indeed. But somehow I kinda like the process of arranging them at the sides of the mosques. 

Well that's about it. That's what happened and hopefully next year I'll get the chance to prepare them again. The process was really interesting and I did all of them myself to the best of my ability. Do check out the video below to view how the card pop up opens up. Thank you!! 😁😁😁


A belated Happy New Year card

NY002

I know this seems kinda weird to blog about a new year card in February! Haha! But yes, I did make it early in February.....so that's why I added the "Belated" in the title.

This card was actually requested by my Mother's friend. I was asked to make it and post it for her to her old high school teacher. She knew that I was busy with my work and other card orders but she insisted that I make a really simple New Year card for her anyways. And so I did! :)

To be quite honest.....I just didn't know how to make a simple card anymore. Seriously. I had a hard time thinking about it. Because I always tend to add a lot of things to it no matter what. Since her budget was quite low, I had to figure out how to simplify it as much as possible.


I immediately thought of that one particular die cut template I had with me for quite a while now. I used to love using it a lot when I first got my Sizzix Big Shot die cut machine. But it's been a while since I used it and it was fun to use it again. 

I wrote the Happy New Year words myself with a watercolour brush. That was fun too! As I was writing it I realised how nice it is to send someone a New Year wish. I should make it a point to do it as well next time. Because I know it would definitely make someone feel happy to hear from you and to read all those lovely wishes especially at the start of the new year. New beginnings.....a brand new feeling....a fresh start.

Just thinking about it gives me a good feeling. Imagine getting the card yourself. Even better right? Funny how simple wishes could make people happy. It doesn't take a lot of effort. But the effect of the giving goes a long way.


Pop up balloons birthday card

 HB130

This birthday boy card was indeed a rush to make. I didn't get much time to do it as I was given such a limited time to get it done. Usually I take such a long time to get a card done. I can be pretty meticulous and find it hard to make a decision. In short, I'm super slow. So I really shocked myself when I did get it done in the end. Haha!
 
I'm 100% sure that part of the reason is because I was give 100% freedom to design it anyway I like it. I was only told that the colour of choice is blue, so there must be blue colours on the card and the boy's age and name must be added on it too. That's about it!
 
It had to be simple because of the time constraint. That was the only way I could get it done on time. I was lucky enough to have the type of pattern paper that was suitable for the occasion and everything just went well after that. I was relieved! I really love the balloons pattern paper. Finally I get to use it for this card. It's super cute for boys that age. And from there I got the idea to make pop up balloons. I drew and cut the balloons one by one by hand. No die cuts ok!! Haha! Just a simple pattern to draw and cut. Easy!

I also wrote the sentiments myself using a small brush and ink. Gosh I'm so glad that I could do it myself, because then I never have to worry about printing them again. Or stamping for that matter! Just write it! As simple as that! I do have to get me more ink colours though. The ones I have now are quite limited and only suitable for limited colours of cards. Do check out the video below! Thank you!! :).


Pink and green pop up anniversary card

AC015

March must be a month that I concentrated a lot on making "card in a box" cards. This pink and green anniversary card is one of them and there's plenty more coming soon! I have always loved combining colours of pink, green and white. And so when I got a request to do a card with these colours I got really excited!

I have used that checkered pink and green pattern paper before for a tri-shutter card this year and I used it again for this card because the pattern looks good for the box. I had fun decorating the card with lots of green, pink rhinestones and pearls too. So the box looks so fancy with those little precious gems on it. It enhances the look of the card and makes it look a little fancier than usual. Just simple add ons can make a lot of difference to a simple design.

Brush lettering was simply something I can't seem to run away from lately as I am so in love with it these days. I just had to write the sentiments with that technique. Furthermore if I didn't practice writing with the brush every other day, I might lose the skill. So, why not just do it right? 

Arranging those craft punch heart shapes that pop ups from the box one by one was a little challenging because I have to make it look balanced. Not too many of the big ones and not too many of the small ones either. The quantity has to be balanced out.  

Hope there will be more pink and green combo handmade cards coming in future with a different twist to them. I just love exploring new ideas with it! Do check out the video I made with the card and see how it pops up when I open it! Thank you! :)


Happy 2nd Anniversary tri-shutter card

AC013

I haven't made a new tri-shutter card design for a long time now. I think the last time I made one was in 2013. This new one has two photo frames attached to it for me to insert a couple of photos inside it. Actually, the whole idea was thought out because I wanted to make it easy for me to make the cards in advance and let my customers insert their photos in the frames themselves.

But in this case, my customer had posted the photos to me and asked me to do it for her. Perhaps in future, I'll let them do it themselves. I made the photo frames easy to insert photos in and out of it. I'm already having lots of ideas coming out for future card designs with photo frames attached to them. I love it when my customers get involved in the process as well. They can decide on their own which photos to put wherever they like on the card.

The colours for this card was decided by my customer. She wanted the pink and green theme. The first thing that came to my mind was these pattern papers I had and how I could pair them together with those sweet pink paper roses I made using my die cut rose pattern. I'm still not bored using those die cuts yet! Haha!! So perhaps you'll see more of them soon.

The Happy Anniversary sentiments in front of the card were hand stamped using clear alphabet stamps I got from Popular Bookstore. I just adore them to bits! I wish they would sell the same type of clear stamp font in a smaller size though. But this big one was really nice to work with and stamped really well on paper too. They were such a good bargain. I drew a pencil line across the paper before stamping the letters one by one. It was challenging but fun to do it. :)

Those sparkly stones were added one by one on the diamond checkered pattern paper too. I don't know why I just love doing that on this type of pattern paper! Somehow it gives the paper some added value and makes it look more interesting. Otherwise, it would be a bit dull. Do check out the video of the card below and view it in motion :). Thank you!


Welcoming a new born baby boy


NB012

I got a request to make a new baby card for a new born baby boy and I was excited to try using those 3D pop up stickers that I bought last year.  I remember using something similar on a new baby girl card I did before. You can view that card at the link HERE. When I did that new baby girl swing card last year, I wanted to do a baby boy version of it too but never got around to doing it till now.


The design for both cards are more or like the same except for the colours and some minor details. I wanted the baby boy card to have the same polka dot pattern paper but since I didn't have one on hand, I decided to create my own using some teeny tiny dots made from a craft punch. I just love doing that on my handmade cards. I've done it so many times before. It's a good way to fill up an empty space and make it look more exciting and interesting.


I actually like to sew on felt but as usual I'm just too busy with other projects to do so. But for this card I do get to sew a bit on felt, just the eyelids and it was challenging especially since I don't have enough practice to make it look perfect. I couldn't think of any other way to make the eyelids except for sewing it. Drawing it using a pen is messy and is not pretty at all. So sewing is the way to go! :)

Since I was really rushing when I made the card, I never even get the chance to take a video of it. My digital camera conveniently ran out of battery at the time I wanted to do the video too! Just my luck! But I'll make another one of this card just for the video one day. Because it's a swing card and I like to show how it looks when it swings! ;)

Featured Post

How to make two tone tear drop shape quilling flowers

We are coming close to mid February and I'm blogging about something that I did last January! LOL! It's been a month sin...