Showing posts with label Beads. Show all posts

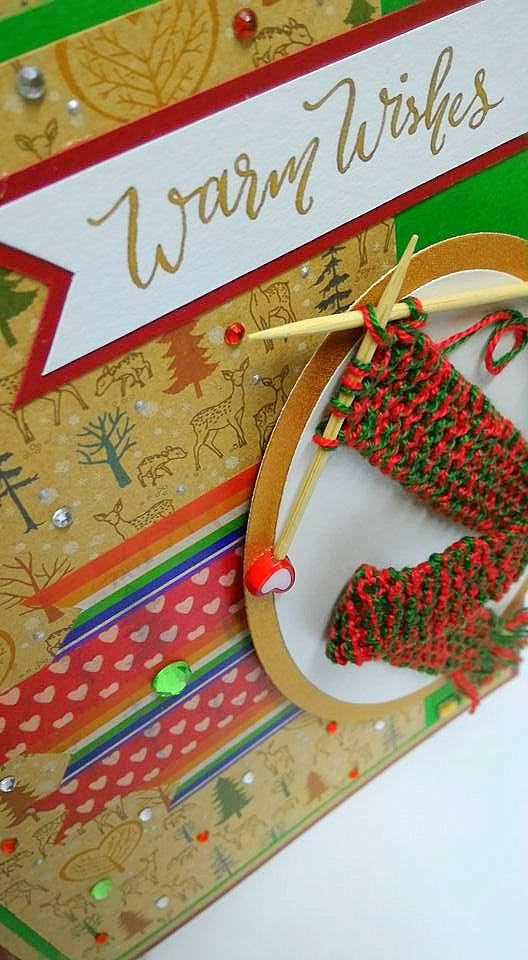
Miniature hand knitted scarf on Christmas card


Hello again! 
Today is the day! It's Christmas day! When people are busy celebrating Christmas and enjoying their holidays, here I am writing about my second Christmas card design for 2017. This is a card made for a dear friend of mine. I planned to post it before Christmas just like the other card I made, but unfortunately, it had to be postponed. Boohooohooo!! So sad!

I made something for my friend and I plan to post it along with this card. Until that gift is ready, I can't post it yet. So I'm pretty stressed out here trying my level best to get it done before the year is over. It could be a new year's gift as well, so I'm working as fast as I could to get it all done on time. 


I really enjoyed making this miniature scarf for the card. It's just so cute. I think I made so many of them in the beginning when I was experimenting with the measurements. I had to make sure they would fit nicely on the card. In the end, I think I made it  a bit too long for the card. To be honest, it took me longer to make the scarf compared to making the miniature sweater. Next time I'll make the scarf shorter. Lesson learned! LOL! Since it's for a Christmas card, I used a dark green and red yarn for the scarf. It's a lot harder to knit with such a small yarn but with lots of practice, it gets easier.

One thing for sure.....knitting takes such a LONG time to finish. It takes FOREVER!! hahahah!! So although the design is simple, it sure is time consuming. Since I myself am just a beginner, it takes much longer to get the job done compared to experts hahaha.


As always, every time I want to write the sentiment on the card, I will use my Speedball calligraphy pen and my favourite ink from Dr Ph Martin. I just love how smooth the ink is. Although my writing is not that great, somehow the pen makes it look good...LOL!! Believe me, the pen sure do wonders! Come to think of it, I need to get more colours for the ink. I keep using the same gold colour for my cards, over and over again. 


I really love the knitting needles that I made for knitting the scarf. Especially because of the heart shape beads that I used for them. I don't have a lot of them in my collection. Just a few left! I bought them years ago when I was staying in Kuala Lumpur. I see a lot of people who makes miniature knitted scarf for cards would use round beads like the ones I used for the miniature hand knitted sweaters. But for this one I just had to use the heart shape ones, for a couple of reasons. One because they match the colour of the scarf and second because the person who is receiving it loves hearts so much. ❤❤❤


Love themed birthday swing card

HB119

Another swing card design for this month. It's a birthday card this time. A lot of dark red and green combination with this one. In fact I think there's quite a lot of red going on here! hehe!

I wanted to use the big wooden flower bead that I got last year as the focal point of the card. The one and only stock I have! haha! I guess this card is a combination of a lot of things that are limited in my collection. Some were given....some were bought. The ones that were given, was kept for quite a while with me because I adored them too much to use them..... But I can't keep them with me for too long ....I have to use them some day right? Otherwise, there will be too many craft stock inside my room and very little space left for me to do work there.

There were some parts of the card where I applied some molding paste. Flower patterns this time around seemed suitable since there are a lot of flower designs on the pattern paper itself. I enjoyed decorating the card using molding paste although it is quite a messy type of craft. But seeing the pattern formed on the paper somehow thrills me :D. Textures gives the card a different feeling. Hence, more molding paste artwork projects coming this year.

Played with a couple of clear stamps that I bought from Popular Bookstore. They seem to sell a lot of new cool designs there now. Super cheap too! I couldn't resist buying them every time I visit the shop. In fact I just bought some new ones yesterday. Ooooppppps! There goes my budget this year!! LOL! They also sell a lot of pretty acid free pattern papers. Very affordable as well. I like that very much!! :D Hope it stays that way for a long time hahaha!

Daisy stitch mini pocket notebook with butterfly motifs


This is the second time for me to do the daisy stitch mini pocket notebook. The first time was when my fellow crafter friend Asma' taught me how to do it during our craft gathering last February. But the one I did at that time was a little simpler than this new one because this new one wraps the pocket notebook and seal it with a string all around it.


It was a first time for me to use the curved needle too. Coincidentally I found it when I was shopping for beads at a craft shop. I couldn't resist buying it! I once saw a video tutorial on how to sew handbound books and the lady who was doing the demo was using this type of needle. It seemed easy for her to use it so that's why I had to give it a try and see how it works for myself. I love it. :)


Another different thing about it is how I decorated the cover of this mini pocket notebook. I simply used a thick cardstock for the cover which I normally would use to make cards with and I pasted on it as many paper monarch butterflies as I could all over it. I used the Martha Stewart Monarch Butterfly craft punch for this design and once I pasted all of them on it, I sort of covered them up with mold paste. Then, to make it a little more interesting, I used 2-3 types of distress ink to give it colour and character.

I loved how it turned out the way it did. It was a really fun project. I use the mini pocket notebook to write about my new healthy diet. Everything about what food I can eat and what I should avoid. I can carry it with me anywhere I go and keep it as reference in case I need it when choosing what to eat. It's handy and pretty too! :)

Pink and blue flowers hand-bound book


Here's another one of the hand-bound books that I've made in November. When I made it I didn't have any plans on who I was giving it to or selling for that matter. I was just making it because I was so into making hand-bound books with beads. I just kept on making them non-stop. Plus because I needed to practice making them before I forget how to make them completely! Hahaha!

I really enjoyed making these books. The ones I've been making were made using quite a thin type of paper which is only 80gsm for the pages. I did try though making books using 120gsm paper and I love them! In fact, I think I love them more than the 80gsm type. Simply because I think they turned out looking better than the 80gsm ones. Plus it would be good for writing as well as sketching. But not for painting though. If it was for painting, then perhaps I need to use the watercolour type of paper for that purpose. 

Hand-bound books great as gifts. Functional too! I love giving people something that they can use. Maybe perhaps it's because I love getting gifts that I can use too. I mean, what's the point of having something pretty in the house and it just sits there without any purpose. I'm a practical person, and I love things that I can benefit from. I guess I was brought up that way. I should thank my Mom for that! :D

At last the book went to a very close friend whom I knew since I was primary school.....well....actually, she's a close friend of the family....she was the one who helped my Mom when my father passed away many many years ago....so she is quite dear to my heart. When her birthday came, I just had to give this book to her. She has never seen a book like this before. It really thrilled her to bits! She adored it very much. And that really made me very happy.

It doesn't take a lot to make people happy. Make the move and spread the love! :)

Colourful hearts hand-bound book


I love making notebooks that has colourful combination of colours like this one. But it's not always easy to get a wrapping paper or pattern papers with many colours like this. I love this combination of colours.  If I'm lucky I'll be able to get one at the stationery shop, if not, I will have to settle with whatever designs they have. I used to make a notebook with similar colours like this but the heart design on the cover were a lot smaller compared to this one. I really loved it but I can't seem to get the same one anymore. 

I enjoy making these notebooks but I prefer not to decorate anything on them. Just leave it as it is. Let the owner of the book decorate it anyway they like it. I just focus on sewing them together. Which by the way is not as easy as you think! It's a lot of work! hehehe!! Only those who have done it before know and understand what I'm talking about. But the experience of sewing it is really worth the while.

For this book I used a different type of beads. It's plastic but it kinda looks like crystal to me....hahaha....who am I trying to kid?? But really....it does, doesn't it? Well......from a far it does! I love using this type of beads for this kinda binding technique. I have many different types of colours for the beads too in my collection. So, I thought it would be nice to use them for this book binding project. At least they are used for many different craft project instead of just for making beaded bookmarks.

This book is going all the way to New Mexico, USA.....I hope it arrives in good condition. But most of all I hope the receiver will love it as much as I do :).


English roses hand-bound book


I started sewing books again.....at first I almost forgot how to begin....the mind gets rusty after a while. I sewed quite a few books and all of them I sewed with beads on both sides of the book. It's a new way for me to sew them nowadays. Loving the new technique right now. :)

I figured out that this new way will save me a lot of glue as well as I need not glue the covers onto the signatures of the book, instead, I just sew them together with the signatures. Some might not like it that way, but I really do love the idea at the moment and that's how I plan on making them right now until I find other more interesting ways to do so in future.


This is just one of the books I made with beads on them.......will blog more on the other books I've made soon. For this particular book, I used plastic pearl beads as decorations. They seem to suit the English style roses wrapping paper that I bought. 

I prefer to make these half A4 sized hand-bound notebooks instead of larger ones. I love to make them and give them away as gifts to loved ones too :)


Rainbow beads slotted quilling tool


I'm getting the hang of making these slotted quilling tools now.....so far, it's been quite thrilling :). Especially the part of arranging the different colours of beads inside the plastic tube. This one was a request from a customer of mine. She showed me the different colours of beads that she would love for her quilling tool and I was very happy to do it for her.

Hope to make more in future with other colour combinations. ;)

Do check out the video below to view how to use this slotted quilling tool :)


Featured Post

How to make two tone tear drop shape quilling flowers

We are coming close to mid February and I'm blogging about something that I did last January! LOL! It's been a month sin...