Showing posts with label DIY craft. Show all posts

DIY Quilling Paper Organizer


Hello everyone!

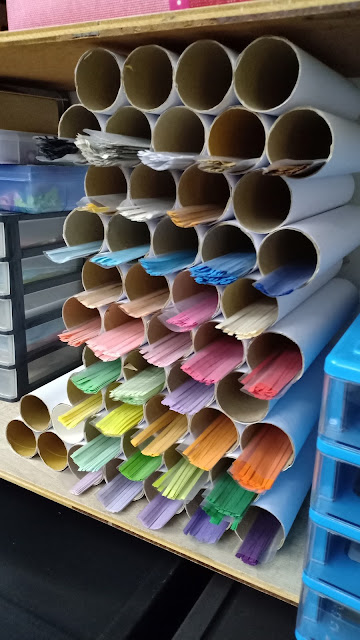
I'm sorry I have been missing in action again but this time I guess I went a little to far. It's been months I know. I miss sharing stuff here.Today I have something I'm excited about to share with you quilling lovers out there. Especially quilling beginners who are on a tight budget and loves to recycle stuff like me. If that's you then you would appreciate this post very much.

I do wish that I had done this years ago when I was extremely active in quilling. It would have helped me tremendously with my work. Nevertheless I'm happy that I did it now especially when I am in the process of redecorating my craft room.This quilling paper organizer would definitely stand out.

I have always been having problems storing my quilling papers. I've been keeping them in plastic casings individually according to their colour and placed them all in baskets for years now. All jumbled up together, rarely neatly arranged, no matter how hard I tried. Always looking so messy in the baskets.

So for the past few months now, I have been collecting some empty kitchen towel tubes. They are relatively long enough for my quilling paper. I don't think that it's suitable for those really long quilling paper that one buys from craft stores. 

My quilling paper are made from A4 printing papers. Although it is a little bit longer than the tubes, it's ok because the paper will be placed mostly in the tube itself. So even though the ends of the paper will be seen coming out of the tube, a major part of it will be in it. So the ends of paper won't bend. It will be laying straight along the tube. Each tube can fit hundreds of quilling paper. So I will have enough space for all my quilling paper from now onward. Awesome! 

I made a video tutorial of how to make the organizer for the quilling paper and I uploaded the video on my YouTube channel. If you are interested to see how it's done, do check it out a the video below. I do appreciate it a lot. Thank you so much! :)

How to make your own stamping tool | CHEAP and EASY!!


Hello everyone!
I'm so excited to share with you about this diy stamping tool I just made! This really helped me with stamping again. I rarely stamp anymore but with this new tool I'm stamping like crazy once again! LOL! I have a lot of collection of clear stamps that I bought or received from friends over the years and recently I'm getting free clear stamps from a craft company, so I am thrilled that I can use them now and decorate the stamped images on my handmade cards!

A lot of people are so hyped about the MISTI Stamp Tool that's available in the market. I love it too! I've seen a lot of crafters online using it to stamp images for their handmade cards. But since it's super expensive to buy, that's why I decided to make my own. Hopefully one day I can afford to buy a good quality stamping tool like that.

Most crafters face the same problem when it comes to stamping images on paper. We never seem to get enough amount of ink the first time we stamp a particular image. But layering the image with an inked stamp again and again might spoil the image if you don't have a steady hand. So that's why it's every crafters dream to have that stamping tool. Luckily we have an alternative to that now!

Hope you will check out the video tutorial I made and have an idea of how I made the diy stamping tool so you can make one yourself! Thank you for watching! And have fun stamping!

Handmade hot glue gun holder


I'm so happy that I finally had the time to make my very own handmade hot glue gun holder yesterday using some double sided tape rolls and tissue rolls that I've kept for recycling purposes some time ago. I never throw them out ever since I found ways to recycle them.

You will be surprised to find out the things that you can do with tissue rolls and such especially if you search about them in the net. I for one prefer to use them to make functional things instead of decorative items for now. I can't remember exactly when I saw a tutorial on the hot glue gun holder but it was on Facebook. Ever since then, I wanted to make one so that it would be easy for me to use it. I needed a specific place for me to put it away after using it too. So it was high time I did this project.


Since the double sided tape rolls had prints on them, I decided to paint them to hide those prints. I am just so lazy to paint them but in this case I had to. The prints were too obvious. I just had to hide them. The red acrylic paint didn't manage to completely hide them so I covered it up with the bronze colour. Although it may not look that pretty, at least it served the purpose and got the job done. 

At first I thought it would be ok to just leave the hot glue gun holder on it's own. Then I thought it would be good to attach it to the second stationery holder I made. Yup, I have two of them now on my table! Haha! Secure it there so that it would look neat. After that I had another idea of attaching more tissue rolls on the same row as the hot glue gun holder. I needed places to hang some other items like the stapler, scissors etc. I wanted to fully utilize the stationery holder as much as I could.

Some might say I'm a bit frugal for doing this but believe you me, all I was thinking about was how to recycle and how to make work easy for me in future. I definitely have solved my problem by doing this. My pens, and other stuffs never get lost in my studio and are easily found because of this holders. My stationery items have their own place now. Loving it! 

Hope this will give you an idea to recycle your tissue rolls and such. At least it will help reduce the waste in our country. :)


DIY stationery holder


I think I've always been a very practical person. Not focusing too much about the esthetics of the things I buy, but more concerned about how the product will improve my life. I guess this has something to do with my Mom's teachings since small.

I also have the tendency of recycling things in the house that I find can still be of use to me. Why throw them away when they can still benefit me somehow. Some used products can't be recycled and are thrown away and some can be recycled and I will turn them into something useful and give them a new life.

Used toilet rolls for example. I have been thinking of how I could reuse them for months now. During Chinese New Year, an idea just hit me. I wanted to fill the box that I got when buying drinking water, with those toilet rolls and use them as stationery holders! I really needed one anyways since what I was using before could no longer hold all the important stationery items I use everyday. I wanted the important ones to be kept in one place and make it easy for me to find them.

Since the box I wanted to use is quite big, I would need a lot of toilet rolls to fill it up. So the collection began since CNY. I kept collecting them one by one until one day the whole box was filled up with the rolls. Since I am too lazy to decorate it with a lot of fancy decorations, I kept the decoration minimal. For me, what is most important is the function. 


The first thing I did after the collection of toilet rolls were complete, was to paint the box with white acrylic paint. Then I would glue all the toilet rolls together using a hot glue gun. Glue them one by one to the box. This way, they will stay put in the box and won't move around when I add my stationery items in them.


I then filled the rolls with all my stationery stuff. I was able to fit in all my pencils, pens, markers, rulers, glue, scissors, brushes and many more stuff in it. I was so happy they all fit in! But as you can see, it looks so simple and unfinished. I didn't even paint the toilet rolls. I don't have the time for it. I just kept it simple.

Then, I got another idea. Since the box is big, I thought of using the space outside it as a notice board!  So what I did was, I took an old Styrofoam sheet I had, cut it up to fit the size of the box and wrapped it up with a dark blue paper. Pasted it on the box and walla!!! I got myself a mini notice board that I can use to pin my To do List or pin other reminders.


I didn't stop there.....I continued with another idea, which is to paste on the other side of the box with magnets!! Yes, so if I wanted to use the other side of the box, I could use magnets to stick notes there too! 

I really love this idea and I hope this will inspire others to recycle the toilet rolls too. If you are not lazy like me, you would probably be more creative in decorating and painting the stationery holder. It would look pretty for your craft room! Remember to recycle those toilet rolls and keep them away from the junkyard. Make something pretty with them, and there are a lot more ideas to be found in the net that we can do with the toilet rolls. Have fun!!

Featured Post

How to make two tone tear drop shape quilling flowers

We are coming close to mid February and I'm blogging about something that I did last January! LOL! It's been a month sin...