Showing posts with label Rhinestones. Show all posts

Miniature hand knitted scarf on Christmas card


Hello again! 
Today is the day! It's Christmas day! When people are busy celebrating Christmas and enjoying their holidays, here I am writing about my second Christmas card design for 2017. This is a card made for a dear friend of mine. I planned to post it before Christmas just like the other card I made, but unfortunately, it had to be postponed. Boohooohooo!! So sad!

I made something for my friend and I plan to post it along with this card. Until that gift is ready, I can't post it yet. So I'm pretty stressed out here trying my level best to get it done before the year is over. It could be a new year's gift as well, so I'm working as fast as I could to get it all done on time. 


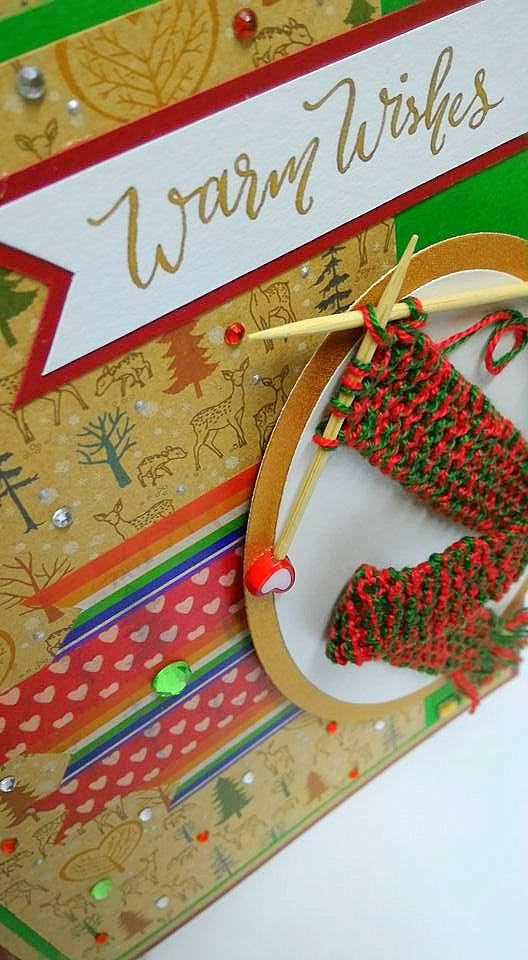
I really enjoyed making this miniature scarf for the card. It's just so cute. I think I made so many of them in the beginning when I was experimenting with the measurements. I had to make sure they would fit nicely on the card. In the end, I think I made it  a bit too long for the card. To be honest, it took me longer to make the scarf compared to making the miniature sweater. Next time I'll make the scarf shorter. Lesson learned! LOL! Since it's for a Christmas card, I used a dark green and red yarn for the scarf. It's a lot harder to knit with such a small yarn but with lots of practice, it gets easier.

One thing for sure.....knitting takes such a LONG time to finish. It takes FOREVER!! hahahah!! So although the design is simple, it sure is time consuming. Since I myself am just a beginner, it takes much longer to get the job done compared to experts hahaha.


As always, every time I want to write the sentiment on the card, I will use my Speedball calligraphy pen and my favourite ink from Dr Ph Martin. I just love how smooth the ink is. Although my writing is not that great, somehow the pen makes it look good...LOL!! Believe me, the pen sure do wonders! Come to think of it, I need to get more colours for the ink. I keep using the same gold colour for my cards, over and over again. 


I really love the knitting needles that I made for knitting the scarf. Especially because of the heart shape beads that I used for them. I don't have a lot of them in my collection. Just a few left! I bought them years ago when I was staying in Kuala Lumpur. I see a lot of people who makes miniature knitted scarf for cards would use round beads like the ones I used for the miniature hand knitted sweaters. But for this one I just had to use the heart shape ones, for a couple of reasons. One because they match the colour of the scarf and second because the person who is receiving it loves hearts so much. ❤❤❤


Salam Aidilfitri pop up card

 HR030
 
I started working on these pop up raya cards in early May.....I was supposed to start earlier because I received the order to make them about a month earlier if I am not mistaken but there were a lot of things that came up and my work had to be put on hold for quite a long time. One of the reasons that made it almost impossible for me to work was when we had to rewire the entire house. A fire might start if we didn't do something quick. I had to remove all my things from my studio since it was no longer safe to work in it.  All the things inside it had to be taken out and placed in another room. Since I had a LOT of stuff, it took me at least 3 days to do it!!! Yikes!! 3 days gone just like that. After that, it was hell for me because I was not able to do work comfortably in the other room. Most of the time I was working on the floor and aching all over trying to get some work done because I just cannot just sit around doing nothing. It's just not me. It also took the electricians quite some time to do the rewiring in my studio and plus I requested them to make some shelves. I really needed those shelves badly since I had a lot of things in my studio that needed a space to keep them in. But that was just my room....I had to worry about the wiring done in the other parts of the house as well. I never knew it was going to be that difficult and so time consuming. But I am glad we did it and now we feel a lot safer at home with the rewiring all completed. Alhamdulillah....I thank God that everything went well.
 
 
I was requested to make about 30 pieces of this raya card design because my customer wanted 30 small raya cards and 5 big ones. I'll blog about the big ones later. She was hoping that I could do 40 pieces of the small ones and I wished the same too but since my time was quite limited, I only managed to get done 30. I started by making the ketupat ribbon first like the ones in the photo above because they are the focal point of the card. So it was important to get them done first. Once they are settled, I proceeded with other parts of the card.


Writing the raya wishes with the calligraphy pen was nerve wrecking! The thing is, even though I knew I was not good in writing them, I still did it anyways. HAHA! It's all because I wanted it to be my own. I didn't want it to look like anyone else's. Ever since I started writing my own wishes or sentiments on cards, I never stopped. I never print anymore....I just write them myself. It's more satisfying I suppose. Plus it's a good way for me to practice writing. Nerve wrecking because I had to make sure it all look almost the same in writing. I mean I know they won't be 100% exact! But at least, they look similar.


Back in 2015, I already had the idea to make this mini pop up mosque. In fact I even uploaded a photo of it in my Instagram back then. I had already made 2 similar big pop up mosques for 2 other raya cards that year and was thinking of making the mini one for my friends and family. But I never had the chance to do so due to my other commitments. So it was postponed till this year. The minute my customer requested the raya cards, I just knew I had to use this idea for the cards no matter what.


Cutting the green and dark green foams for the ketupat ribbon was a bit of a challenge really. None of them are exactly the same on all the cards as I cut them randomly using just plain scissors. But it was great seeing how they turned out in the end. I just wanted the frills for the ketupat to be something other than ribbons because they would look a little stiff. I've done it before years ago in my earlier raya card designs. They did look kinda stiff. So by making the frills with foams, I'm able to make them sway to the left and right like as if they are blown by the wind or something like that. Making them look more flowy. I kinda like that flowy effect.


I even made my own envelopes for the raya cards. It's easy to do so with the Martha Stewart's score board. Nothing is impossible with it. It was a breeze!! Don't forget to check out the video of the card below. You'll get to see how the mini pop up mosque pops up when it opens. Thank you!!


Red roses easel card

HB132

Red roses!! Oh how I love making them for this card! I made so many of them too mainly because the person I gave them to love red roses so much. I actually made this card in August. But didn't get the chance to blog about it back then so I did it in September. A bit late but better late than never at all. How can I never! Haha! I had to share it here sooner or later.

The design for this birthday and easel card is actually very easy to make. The front part of the card is just mainly pasted with die cut roses and a simple sentiment that I wrote myself using a dip pen with gold ink. I used a patterned paper that had some red roses as part of the design on the corners of it. So that leaves me some space in the center for me to add those red roses and sentiment.

To beautify it a bit more, I simply added some  plastic rhinestones of different colours and some white flower stigma in between the roses. That somehow will help make the red roses stand out a bit more on the card.


I embossed all the die cuts that I used for making the red roses and leaves. It somehow makes them look less stiff and a little bit more real. Although that means it will take me more time to get them done but the results are worth it.

You can check out the video tutorial that I did below of how you can make your own paper roses. It's actually very simple as long as you have all the tools and materials to make it.


Do check out the video of the card below to see how looks like when it opens up and closes. Thank you! ;)

Soft purple and grey pop up hearts box card

AC016

When I first got this request, I thought to myself....hmmm have I ever done this colour combination before?? I thought I had never done it before.....then I remembered I had done it years ago. It was of course a totally different type of card though, but there sure was purple and silver involved!!

The only difference though is that, for this one, the purple has to be a soft pastel purple and I was a bit worried about that. I kept thinking if I could actually make it work! I didn't have a lot of soft purple pattern papers in my collection. So the choices were pretty limited. Same goes for silver or grey colour. Although with the limited choices that I had, I was determined to make it work! :)

There is a really easy trick to match certain pattern paper that does not match with the colours from the other pattern papers if you plan on using more than one type of paper for the card. All I did was simply add those sparkly plastic rhinestones to it or matching ribbons! Immediately it will give the paper something in common with the other. So now they match! Haha! 


At the back of each box card that I made will have a small area for you to write down your personal wishes. I made it simple with just straight lines all the way from the top to the bottom.


Brush lettering the sentiments again for this card and at this point I already started to feel tired of using the brush. It could be because my right hand still hurts. I think I spent at least an hour trying to write this sentiment and ruined so many pieces of paper in the process. I haven't bought a dip pen yet but will probably do so soon for the sake of my aching hand. Still haven't made up my mind on which type of dip pen I should get. Arrrgghh....decisions, decisions!

While I busy myself making up my mind, why don't you check out my video below of the box card I made. Have fun watching it! Thank you!


Red and Yellow Roses tri shutter birthday card

HB131

Red and yellow roses together! I don't think I've ever done that before! But I'm loving it now :). When I was requested to do this combination, I must admit I was little worried but once I found the right pattern paper to match the roses, I was able to figure out how to decorate the card with those colours.
 
These colours turned out looking really bright! I was able to tone it down just a little bit with the cream and dark green colours. This tri shutter card design is similar to the previous tri shutter card design I made before. The only difference is that I just change the colours and the sentiments. The one before was an anniversary card and I think I added less roses for that one. For this new one I figured out how to add more of it without disturbing any parts of the front design and photo frame. 

I had trouble deciding on how to add the sentiment on the front part of the card. The photo frame is big and there isn't much space to add any words without disturbing the photo frame. A decision had to be made and I decided that I would write the sentiments using the brush lettering technique coz then I'll be able to fit in those roses nicely on the photo frame. Unlike the previous design I made the sentiments by stamping the sentiments using clear stamps. They were big size fonts and would definitely not be able to fit all the words. So the brush lettering saved my day!

Here's how I wrote it using the smallest brush I had....


I'm having problems with my right hand now after a minor accident at home. It's a little bit challenging to write now as it hurts quite bad especially when writing with a brush. I definitely need to get me a better brush pen or calligraphy dip pen for writing sentiments as I love how the thin and thick lines form during the writing process. It's a little different than using a ball point pen where the lines are the same thickness. I'm a little over obsessed with the lines these days! haha! Who knew I would be? And it's all because of the brush lettering I've been doing the past few months that got me concerned about it. I think I would be for quite a long time! Haha!

Do check out the video I took of the card and see it in motion! Thank you!


Pink and green pop up anniversary card

AC015

March must be a month that I concentrated a lot on making "card in a box" cards. This pink and green anniversary card is one of them and there's plenty more coming soon! I have always loved combining colours of pink, green and white. And so when I got a request to do a card with these colours I got really excited!

I have used that checkered pink and green pattern paper before for a tri-shutter card this year and I used it again for this card because the pattern looks good for the box. I had fun decorating the card with lots of green, pink rhinestones and pearls too. So the box looks so fancy with those little precious gems on it. It enhances the look of the card and makes it look a little fancier than usual. Just simple add ons can make a lot of difference to a simple design.

Brush lettering was simply something I can't seem to run away from lately as I am so in love with it these days. I just had to write the sentiments with that technique. Furthermore if I didn't practice writing with the brush every other day, I might lose the skill. So, why not just do it right? 

Arranging those craft punch heart shapes that pop ups from the box one by one was a little challenging because I have to make it look balanced. Not too many of the big ones and not too many of the small ones either. The quantity has to be balanced out.  

Hope there will be more pink and green combo handmade cards coming in future with a different twist to them. I just love exploring new ideas with it! Do check out the video I made with the card and see how it pops up when I open it! Thank you! :)


Featured Post

How to make two tone tear drop shape quilling flowers

We are coming close to mid February and I'm blogging about something that I did last January! LOL! It's been a month sin...