Showing posts with label Washi Tape. Show all posts

Rainbow heart pop up card


Hi there!
I'm blogging again today about one of the cards that I made using dies from In Love Arts Shop. I love this one especially because it has a pop up heart inside.

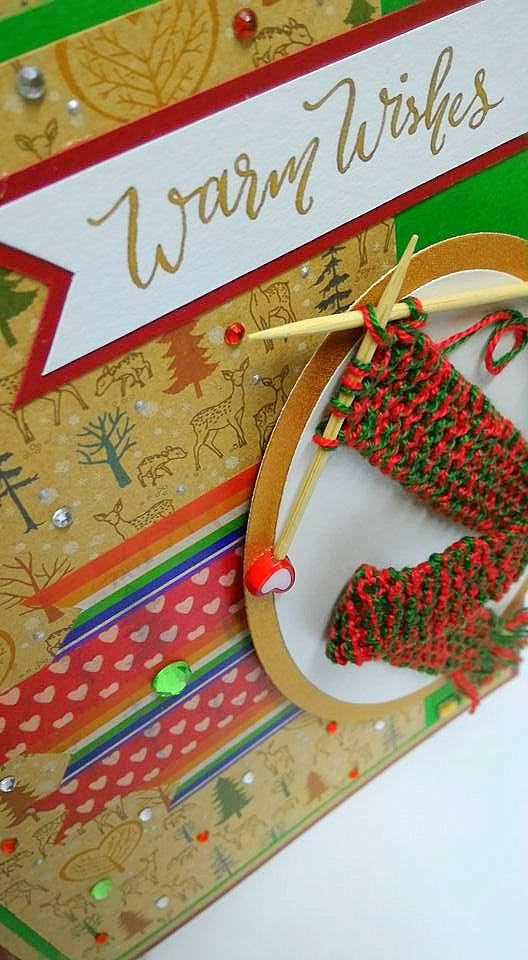
I've made a rainbow heart card like this previously but this one is a little different because the quilling rainbow heart has many more loops than the one I did in the tutorial. A bit more complicated and time consuming as well. I didn't really enjoyed myself making this one, LOL! It maybe my last time making it hehehe!

Anyways, I did however love doing the cross stitch! I think this pattern suits the card the best. Love stitches like that on cards. It's simple and pretty. Pretty simple to sew too.

Of course the die cut letters are the best! It was a little harder to cut that gold glittered paper because it was really thick but managed to cut it after rolling it through the die cut machine 4 to 5 times. The glitters made it difficult to cut through easily. But I really love the results. Really suits the card. I purposely glued the letters on a coloured plastic sheet so that it would look like the letters are floating on the card.

The pop up is just a simple one. I didn't want to make it too complicated. It's a small card anyways. Not much space to do a complicated pop up there. I made sure the heart pops on the left so that there's a lot of space to write wishes on the right side of the card. If you wish to learn how to make that pop up, do let me know so that I can do that tutorial for you.

If you guys are interested to purchase the dies I used for this card, do click on the links I placed below the photos of the dies. Apply the code : FSAZLINA when you make the purchase to get 15% off every purchase. Worldwide free shipping for orders over $25! Thank you so much! 


SKU: DMZH194


Miniature hand knitted scarf on Christmas card


Hello again! 
Today is the day! It's Christmas day! When people are busy celebrating Christmas and enjoying their holidays, here I am writing about my second Christmas card design for 2017. This is a card made for a dear friend of mine. I planned to post it before Christmas just like the other card I made, but unfortunately, it had to be postponed. Boohooohooo!! So sad!

I made something for my friend and I plan to post it along with this card. Until that gift is ready, I can't post it yet. So I'm pretty stressed out here trying my level best to get it done before the year is over. It could be a new year's gift as well, so I'm working as fast as I could to get it all done on time. 


I really enjoyed making this miniature scarf for the card. It's just so cute. I think I made so many of them in the beginning when I was experimenting with the measurements. I had to make sure they would fit nicely on the card. In the end, I think I made it  a bit too long for the card. To be honest, it took me longer to make the scarf compared to making the miniature sweater. Next time I'll make the scarf shorter. Lesson learned! LOL! Since it's for a Christmas card, I used a dark green and red yarn for the scarf. It's a lot harder to knit with such a small yarn but with lots of practice, it gets easier.

One thing for sure.....knitting takes such a LONG time to finish. It takes FOREVER!! hahahah!! So although the design is simple, it sure is time consuming. Since I myself am just a beginner, it takes much longer to get the job done compared to experts hahaha.


As always, every time I want to write the sentiment on the card, I will use my Speedball calligraphy pen and my favourite ink from Dr Ph Martin. I just love how smooth the ink is. Although my writing is not that great, somehow the pen makes it look good...LOL!! Believe me, the pen sure do wonders! Come to think of it, I need to get more colours for the ink. I keep using the same gold colour for my cards, over and over again. 


I really love the knitting needles that I made for knitting the scarf. Especially because of the heart shape beads that I used for them. I don't have a lot of them in my collection. Just a few left! I bought them years ago when I was staying in Kuala Lumpur. I see a lot of people who makes miniature knitted scarf for cards would use round beads like the ones I used for the miniature hand knitted sweaters. But for this one I just had to use the heart shape ones, for a couple of reasons. One because they match the colour of the scarf and second because the person who is receiving it loves hearts so much. ❤❤❤


Seven flowers pop up birthday card

HB123

Way back in 2009, I made my first 7 flowers pop up. It was for a Chinese New Year card. I remembered how excited I was to see all the 7 flowers pop up each time I opened the card. I felt as giddy as a school girl. Back then, in my mind I thought that this pop up was the most difficult of all to make. But now I know, there are others types that are much much more difficult to make compared to this one.

There were little flowers and leaves added to the 7 flowers pop up to make it look like a bouquet of flowers. I didn't want to leave it plain and simple. I just had to add other things to the flowers to make it look more fancy. What do you think? Did it work? heheheheh!!!

I guess that this is the first time for me to use the Teary Loop flowers for my handmade card. I made a tutorial on how to make the flower long time ago and uploaded the video on YouTube, but never used them for any of my cards until now. In the tutorial, I made a small version of it, but for this card, I made the small and large version of it combined as a flower. I like the way it looks, either single or double.

The previous birthday card I made had cross-stitch on it too, where I used 4 different types of colour threads. In this one I only used two colours but had them stitched side by side. I love this idea and will probably use this idea for future cards. The cross-stitch took such a long time to sew on the paper but at the end of the day, the results made me so happy. 

Another thing I would like to mention here is the gold frame that I added to the card. I made it myself using a hard board. After cutting it up, I painted it with a gold colour to make it look fancy. I framed the washi tapes and patterned paper with this frame and decorated it with the flowers and sentiments. The rhinestones simply added some bling bling to it and made it look fancier than before. I just love how it all turned out.

This birthday card was made for someone who is very dear to me. I really hope she likes it. I know that she looks forward to receiving my handmade cards every year, but I sometimes don't have the time to make one for her. I'm so happy that this year, I can. Hey, even handmade card designers have problem sending cards to their loved ones, I kid you not! Hahaha!!

Do check out the video of the card below so you can view how to flowers pop up inside the card. Enjoy!

Double star loop flower pop up birthday card

 HB122

The pop up craze and cross-stitch continues. Not to mention the washi tapes and soft clay too. I guess, you'll be seeing those things a lot in my future designs.....well at least for the next few weeks until I get a little bored using them for my handmade cards. Hehehehehe!!

I've been making a lot of the smaller size cards lately and for today I wanted to share a bigger one for a change. It's not that big though, just half the size of an A4 paper. I started with sewing the cross-stitch all around the edge of the card to form a frame for the decorations. I used 4 different types of red colour embroidery threads. I love the effect it gives compared to using just one type of colour.

The polka dots washi tapes was then lined up with the patterned papers, birthday sentiment, quilled flowers and leaves, and lastly touched up with the rhinestones. I made those double star loop flowers long time ago. But only now do I use them for my design. The flower itself is so tedious to make. Takes such a long time to complete one flower. I guess that's why I never used them before. I do have a tutorial on how to make them if you are interested to try. Check out the video below:


I've always wanted to make this type of pop up technique for my cards. It's not that difficult to make either. I like it a lot because I can paste so many flowers together and not worry about any of them bumping into each other whenever the card opens and closes. Basically, you can use all sorts of subjects to pop up with this technique. I'll definitely make more of this type of pop up in future now that I know how to do it. :) Do check out the video of the completed card at the video below and see how the pop up flowers spread open like a fan when the card opens up. Hope you all like it! :) Enjoy!

Cross-stitch heart pop up card

V066

The cross-stitch craze continues with this little love themed pop up card. I just had to do it. I saw the other day on the net some photos of a cross-stitch heart. It was so attractive to me, I was dying to try it out. And so I did! A small one for the small card.

It was not that difficult to do. The only thing I felt difficult to do was the cross-stitch frame on the card. The size was so tiny compared to the one I did previously. I had a hard time punching out the holes and then sewing them, very tiresome to sew so many around the card. Although they looked really cute, I still prefer the previous size, which is much easier and faster to sew.

The pop up inside the card was the most challenging as it was the first time for me to make a pop up heart way up on top of the card like that. Usually the pop up hearts I've made before didn't require me to use a bigger paper insert for the card. This one did. It was the only way to create that pop at the top. It's difficult for me to explain it here. I guess, I'm talking Japanese with you.....but the point is, it was tricky at first, but once I have figured it out.....it's a breeze!

I wrote the sentiments inside the card. Just a simple one, straight to the point. I just wanted to try out as many different types of pop ups this year....especially the ones I've never done before. Combining a couple of types in one card or just one type it doesn't matter as long as I do it differently each time.

Do check out the video I took of the card below. You'll be able to see how the heart pops up at the top several times. I was just a little excited about the whole thing, so much so that I opened and closed it again and again. Hahaha! :D


More bling bling!

HB121

I was just looking at the gold theme pop up birthday card earlier today and thought to myself......what if I added more bling bling to the card? I have bigger clear coloured rhinestones in my collection that would match the smaller ones and so I started adding them on the washi tapes and thought, hmmmmmmm......not bad! I thought it looked better than before. That's just my personal opinion. :)

Somehow the combination of the big and small rhinestones seems perfect together to me. I wish I had black ones or gold coloured ones.....but since there wasn't any at the store, so the clear ones seems fine here. I just had to blog about it and share the latest look of the card. Because now all of them look like this.....can't help it, I just had to add more bling bling! hahaha! :D

As for the pop up inside the card, it remains the same like the original one. No new additions or changes to it so far. Perhaps I might come up with a new one someday, who knows.  :)


Gold theme pop up birthday card

HB121

Ok, I have to admit, I'm a bit far behind when it comes to using washi tapes on any of my craft work. I bought a few washi tapes last year but never played with any of them at all till now. I must say it was fun playing with them now. Finally. 

I just tried the simplest way to use them which is by cutting them at the ends like we do for ribbons and simply paste them on the card side by side next to some matching pattern papers. I sew all the sides of the gold coloured paper too with a black thread which was another fun thing I love to do. I love sewing thread on paper.... if it suits the card, then I would do it.

Another fun and new thing that I tried this year is adding soft clay as decorations on my cards. It was tough figuring out how to do that but in the end, after a lot of research, I finally got it. At the moment, I experimented a lot on making soft clay decorations that were made by using molds. I had a few free molds from a company from China last year. And some of which I bought from the local stores. I just loved the outcome of it. And the endless possibilities of ways to use them. I just can't wait to use more of them in future. From a far, the soft clay looked like metal, but it's not. I just love the gold effect that somehow hides the fact that it's just soft clay.

Pop ups.....how I miss making them. I want to experiment more on it this year. More pop ups, more fun! It's just a small card and yet, I still wanted to add that pop up inside. I love the idea of adding a surprise inside each card. I made a few ready stocks of the card in case anyone is interested. If not, I'm dying to use them myself. Got a lot of birthdays coming soon! :) Do enjoy the video below!

Featured Post

How to make two tone tear drop shape quilling flowers

We are coming close to mid February and I'm blogging about something that I did last January! LOL! It's been a month sin...