Hello I'm Azlina
I love to design, make pretty handmade cards and exploring other crafts. Do support me on YouTube.
I share a lot of quilling and craft tutorials there.
Lots of love to you! Alhamdulillah, I'm writing here again today after being offline for more than a year. Feels good to be back here, creating once again even though I'm not sure if anybody here will read my post. I will still write no matter what because I want to, my heart is still here. I might have been away but deep inside I never left.
Sometimes once has to make decisions that may not be the best for everyone. Tough decisions indeed. I'm glad I managed them well and now I can be at my happy place again, doing what I love. Honestly I have to say that I was shocked to receive so much love from friends and fellow crafters who were concerned. I can only pray for the best to those who showed me love.
I am so happy I get to make a new quilling video tutorial....something I promised to make before I went offline, please do check it out.
I'm a bit late again at blogging about my latest quilling tutorial. I uploaded the video on my YouTube channel a little over a week ago. I've been so busy I didn't get the chance to blog about it. So here I am on the last day of 2022, blogging about it before midnight! Haha!
I must admit that this quilling tutorial is the most challenging tutorial I've ever done. Never before have I ever combined so many tutorials in one video. I almost gave up at one point. Shooting the video was tough but not as tough as making a script for the video. There were times when I just didn't know how to explain in words about how to make those vortex shapes. Now I know why some YouTubers who does craft tutorials never talk at all in their videos. They just add music and the video is done! Super easy. But I just can't do that. I always want to talk in my quilling tutorials. It would be weird if I didn't say anything.
In the beginning I didn't plan to combine so many vortex shapes in one video. I only wanted to do one vortex shapes tutorial at a time. That would be less stress for me but I changed my mind and did them all in one video because all those vortex shapes had a similar starting method. So it would only make sense to make one video for all of them. I'm so glad that I managed to complete the video before the year ends.
I also made some quilling creations using some of the vortex shapes I taught in the video. There is just so many possibilities, so many designs can be created using these vortex shapes. I've only made a few this month. Hope to make more in future.
Here's the video of the Quilling Vortex Shapes Tutorial. Do check it out!
It's good to be back here again! I've got a new quilling tutorial for you guys. I'm a bit late in updating about this new tutorial. I uploaded the video on my YouTube channel a few days ago. Actually I got a request to do a tutorial on this quilled star from a lady named Jenny Hand from Facebook. She found a photo of a quilled star on Pinterest, but was unable to understand the directions on how to make it because it was in a foreign language. I didn't ask her what language it was or who was the designer. My mistake there, I should have asked.
So, since the design is something I'm familiar with, because I've done the quilling combing technique before, and it's always used to make quilling flowers, I agreed to do this tutorial for her. The only difference from the original design is the colour and that I added the plastic rhinestone to make it look prettier. I'm so glad that I managed to make the video on time for her. I wasn't feeling too well lately, so it was good to be able to help her out. Glad she enjoyed the video. Hope you guys will benefit from it as well! :)
I'm sorry I have been missing in action again but this time I guess I went a little to far. It's been months I know. I miss sharing stuff here.Today I have something I'm excited about to share with you quilling lovers out there. Especially quilling beginners who are on a tight budget and loves to recycle stuff like me. If that's you then you would appreciate this post very much.
I do wish that I had done this years ago when I was extremely active in quilling. It would have helped me tremendously with my work. Nevertheless I'm happy that I did it now especially when I am in the process of redecorating my craft room.This quilling paper organizer would definitely stand out.
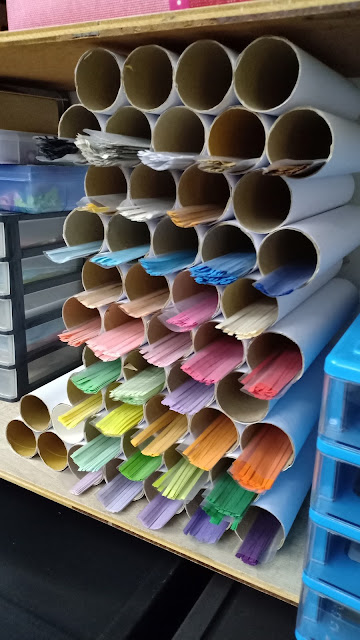
I have always been having problems storing my quilling papers. I've been keeping them in plastic casings individually according to their colour and placed them all in baskets for years now. All jumbled up together, rarely neatly arranged, no matter how hard I tried. Always looking so messy in the baskets.
So for the past few months now, I have been collecting some empty kitchen towel tubes. They are relatively long enough for my quilling paper. I don't think that it's suitable for those really long quilling paper that one buys from craft stores.
My quilling paper are made from A4 printing papers. Although it is a little bit longer than the tubes, it's ok because the paper will be placed mostly in the tube itself. So even though the ends of the paper will be seen coming out of the tube, a major part of it will be in it. So the ends of paper won't bend. It will be laying straight along the tube. Each tube can fit hundreds of quilling paper. So I will have enough space for all my quilling paper from now onward. Awesome!
I made a video tutorial of how to make the organizer for the quilling paper and I uploaded the video on my YouTube channel. If you are interested to see how it's done, do check it out a the video below. I do appreciate it a lot. Thank you so much! :)
How is everyone doing? I hope you are all in the best of health always. I'm back again here with another quilling tutorial. Quilling flower tutorial again to be exact. Can't seem to stop making quilling flower tutorials. Haha! I still got a few more quilling flower tutorials that I promised to make. Not sure if I can make them all this year. I guess some will be completed by next year. "Next year is actually not that too far away. I can't believe that soon it will be 2022. I didn't accomplish a lot this year due to ill health. I really hope, wish and pray that next year things will be better for me. I want to be more productive, God willing.
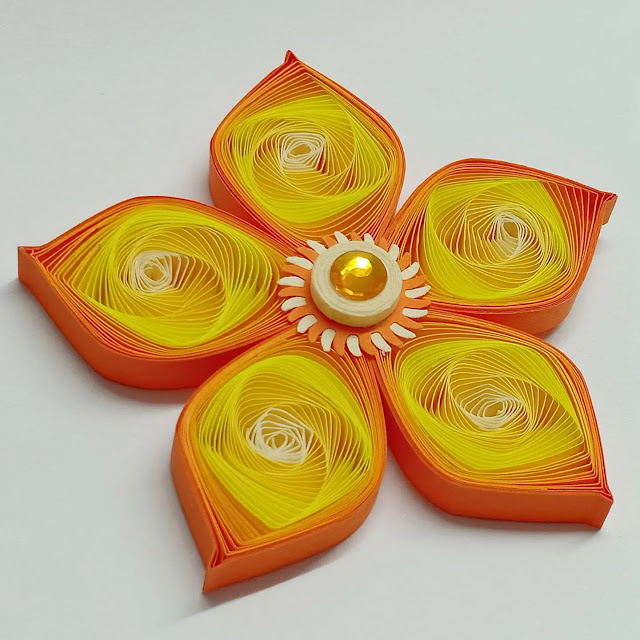
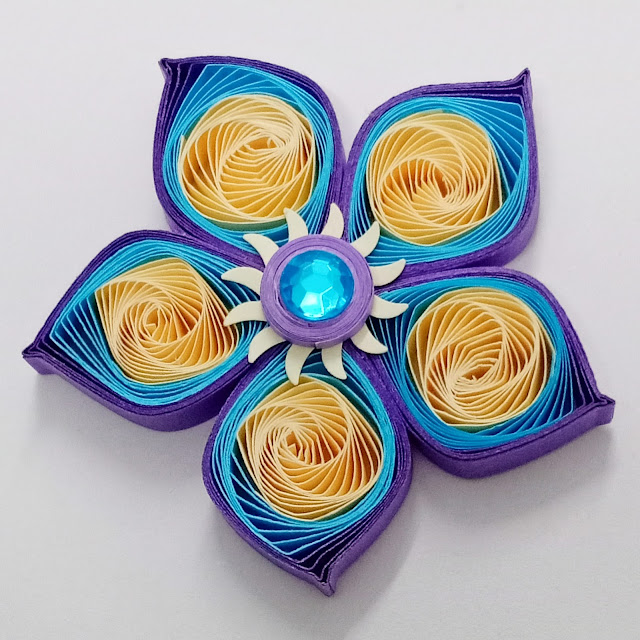
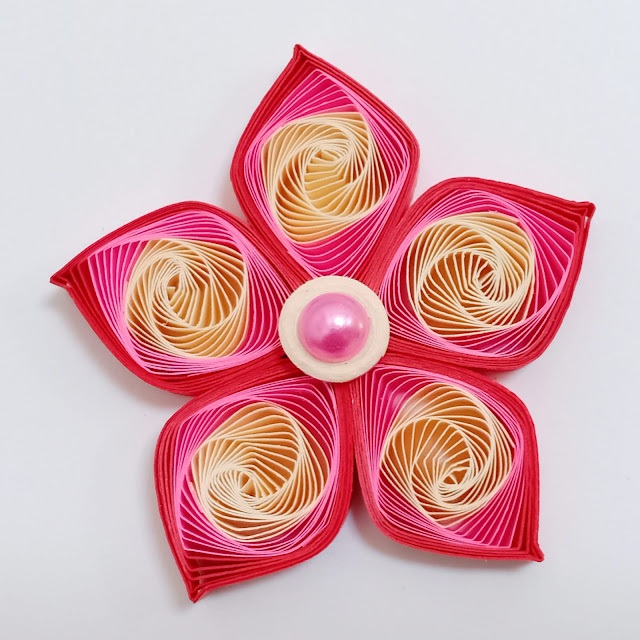
Actually I wanted to make this Pointy Petal flower tutorial months ago but I was worried about how to make the video as it is very difficult to explain the process. In the end I decided to do it no matter how difficult and just wing it. Glad I did it in the end. I know a lot of you out there who are interested in vortex designs as much as I am. There's so much about it to explore.
This Pointy Petal flower is actually similar to the Teardrop Swirl flower I made back in 2019. The difference is just that pointed tip on the petal, the vortex design in the petal swirls almost the same way. So I thought I had to make a tutorial to show how almost similar they are in some ways. But I think now my favourite is the Pointed Petal even though it's harder to make it compared to the Teardrop Swirl flower.
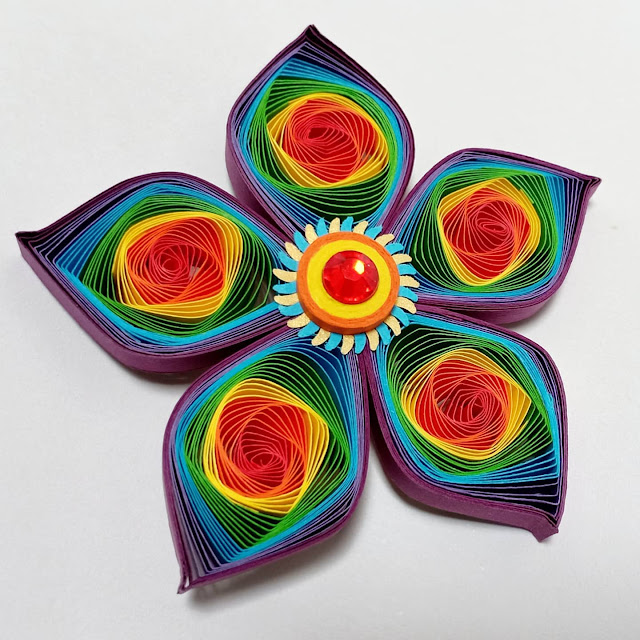
When I made vortex design flowers back in 2019, I enjoyed making them in multiple colours. Most of the time I used 3 colours for the petals but for this Pointed Petal flower tutorial I decided to use just one colour for the petals and try to be more creative with the centre part of the flower where I can play with colours that would match the colour of the petals. The other vortex design flowers I've done before I just added a simple half pearl on it, no need to think much, very simple. So that's why I wanted to try something different this time around.
Do check out my YouTube quilling tutorial below:
I decided to make the Pointy Petal Flower in various colours to show you how it would look like when made in multiple colours. Hope you are inspired to try them out yourselves.
So I'm back with a blog post today after I uploaded a new quilling tutorial yesterday on my YouTube channel. I think it's been about 2 months or so since I last made a quilling tutorial there and I was working on another quilling tutorial but I decided to postpone that one and do this one first since this one is connected to the previous quilling tutorial that I did last August. It has something to do with the Twisted Loops and so I thought it would be better to do this one since you guys are familiar already with the Twisted Loops now.
So here's the story on why I decided to do this tutorial now. As you can see, there are two different Twisted Loops flower design that I made in this tutorial and the blue one was inspired by a quiller I follow on Instagram by the name of hexiaoxiao57. Her flower design is absolutely beautiful. I tried to make it like hers but I don't think I even came close since I used a different type of quilling paper and a different way of making the fringe flower for the Twisted Flower as well. Like I said earlier I didn't plan on making this tutorial but, I had so many requests from my Instagram followers to do it. They wanted to know how to make hexiaoxiao57's flower like the blue one you see in the photo above. Maybe because of the Twisted Loops flower I did before, so they assume I would know how to make her flower design . I got tired of explaining to them how it's done and it's not easy to explain with words, it's a lot easier to explain through a demo via video. I'm not sure why they didn't ask hexiaoxiao57 themselves on how to make the flower. I myself have asked her to make the tutorial too but till now she hasn't made one. So I thought of making my own version of it so that my followers would have an idea of how it's done. It may not be as perfect as hexiaoxiao57's flower but at least it resembles it a bit.
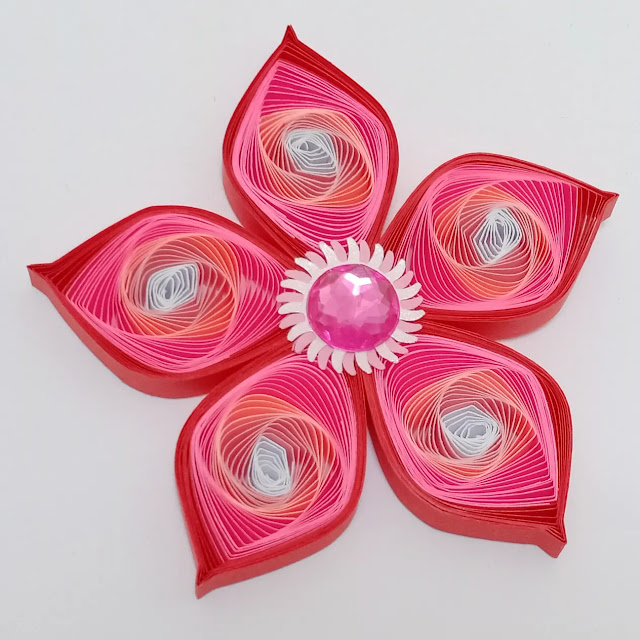
I came up with the idea for the other twisted loops flower design, which is the peach coloured one after I made that blue flower design a few times and I really really love it a lot. It's different because of the way I twisted the loops of the petal. You'll see what I mean after you've watched the video tutorial. I made a few of that design in many colours already. Not sure yet at the moment what I'll make with them but I think I will make simple small cards with them, like Thank you cards or something like gift cards. Yes, that would be cute!
There are many ways to make the center part of the flower, it's all up to your imagination, it doesn't necessarily need to be a fringe flower. As from the photos above, you can see the different types of center part I made, but they're mostly tight coils and you can mix it with bling bling stone stickers. I'm just lazy as well to make fancy center part for the flowers. So I just made simple ones, Ha! Ha!
Anyways, I hope you'll like the tutorial once you've watched it and give the flowers a try. Do check out the video tutorial below and happy quilling guys! ;)
Happy Independence Day to all Malaysians!! We are celebrating our 64th year of independence. I just had to make something for Merdeka day and thought of making this flower to commemorate this day.
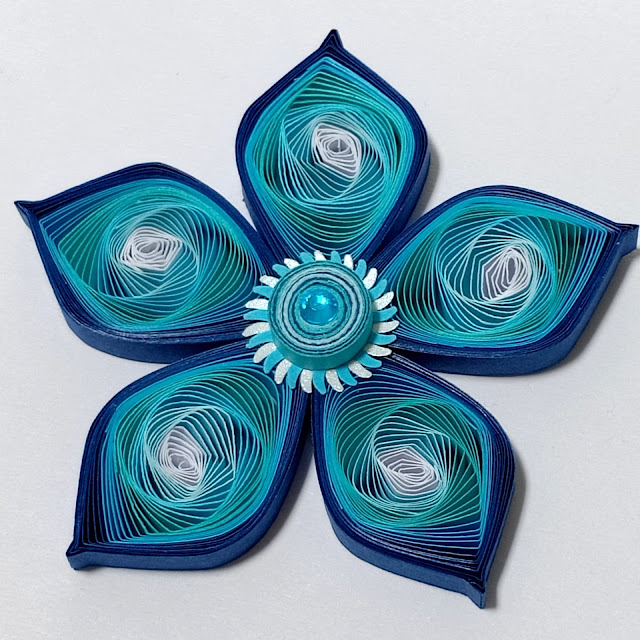
This will be a short blog about the Twisted Loops Quilling Flower I made today using the colours of our Malaysian flag. I didn't know how it will turn out when I got the idea to use this design to make the flower, but I knew that I would need 4 different colour paper to make this flower and coincidentally the Malaysian flag does have 4 colours! So immediately I started working on it.
I chose the white, yellow and red to be on the inside of the petal because those three colours do look good together and have that dark blue colour paper to wrap the three colours to complete the petal. And since this is not a real flower anyways, the colours of the leaves need not be green, so I decided to use the same milk coffee colour as the stem and leaves.
I have been "away" for quite a long time and some might think I was on "holiday" so to speak when in actual fact I've been extremely busy with a whole lot of work to do even though I'm just at home. During this awful pandemic, I have been spending a lot of time at home. I do most of everything online now. I did a lot of gardening as well for a year and now I stopped concentrating too much on that and focusing more on my craft work. Not that I didn't care about it before but this pandemic sort of made me lose my mood for it. I just didn't feel like doing any handmade cards or quilling or anything crafty for months. I was worried that I might lose complete interest in it but fortunately I came around.
I really really miss quilling the most and miss making handmade cards and other craft in my little craft room. I can't count how many times I went to my craft room and wished that I have the time to sit and create something there. It's only recently last month that I was able to do it. Alhamdulillah. So you see, not only did I didn't have the mood but I also didn't have the time for it. There is something lost and something gained during this pandemic, that's for sure. I have learned a lot through this tough times.
When I was able to get back to crafting again, I thought of what to make and it occurred to me that there are some of my old quilling designs that I made years ago which I felt I needed to explore more. So I went back to search of what I did before that I could do more with. One was the Twisted Quilling Leaf. I did a video tutorial on that one and it's on my YouTube channel, which you can view the tutorial by clicking at the link --> HERE.I've never made a flower design with this Twisted Quilling Leaf so I thought why not I give it a try.
If you have watched my Twisted Quilling Leaf video, you will see that I used 3 different colour quilling paper to make the leaf, so it's multicoloured. So for the quilling flower, I used 3 different colour quilling paper as well. The difference as you can see is that I wrapped each piece of the petals, which I didn't do for the leaf design. So that's the difference. This way, the petals look neater wrapped up with another piece of quilling paper.
As usual I used shredded A4 papers to make the flowers. I prefer to use this type of paper especially when I want to make tutorials. Because not a lot of people can afford to buy standard quilling papers and some might have problems getting them as well at their hometown. So using shredded coloured printing papers are always the best choice.
I have prepared a video tutorial on how to make this flower so that you can make them too. It's very easy to make especially for quilling beginners. Do check it out by clicking at the link --> HERE. Hope you'll enjoy it! Thank you! :) I also made a simple quilling leaf tutorial at the end of the video for quilling beginners. Just a simple two tone quilling leaf that goes well with the flower.
In the video I did mentioned that the colour combination I chose for the flower was inspired by the BTS song BUTTER. It's so true! I can't stop listening to that song ever since it was released. I love everything about the song, the colour concept, the song itself, the melody, the lyrics, the dance steps everything! I said I was kidding about the number of petals of the flower but actually I wasn't kidding at all! LOL! Seven petals did represent the seven members of BTS. I think this is the first time I made a flower with seven petals and I love it a lot! :)
I'm hoping to make more videos after this, preferably quilling tutorials. I already have something in mind but making a video especially a tutorial does involve a lot of time to get just one video done. It's always a struggle for me with my limited energy but I try to stay positive and have as much fun in the process.
HERE IS THE VIDEO TUTORIAL
⇓⇓⇓⇓⇓⇓⇓⇓⇓⇓⇓⇓⇓⇓⇓⇓⇓⇓⇓⇓⇓⇓⇓⇓
Here are some of the Twisted Loops Quilling Flower that I have made with other colour combinations. Hope these photos will inspire you to create these flowers too.


