Cute cards


Ever since I got my hand powered paper shredder, I just couldn't stop shredding papers....at least a few times a day...LOL! I just love looking at how the paper shreds and drops into the transparent casing hahahaha.....silly huh??? Yup....I can be so silly sometimes hehehehe......sometimes the simplest things can give me great pleasure. :)

I tried making gift cards for myself to use and sell. My previous gift cards were smaller in size and I've never done quilling on them before. So I tried to make these for a customer of mine who loves to order gift cards from me. These gift cards are so easy to do especially since the design is so simple. And since I got the paper shredder to help me cut the paper......it's a lot faster to get the quillings done on the card. 

I don't know about what you guys think of this design but I somehow love the card just the way it is. Just one flower with a stem and two leaves. So simple and cute. This is the first time I'm experimenting doing stems using the quilling technique. I usually make the stems using colored pen. But, somehow it doesn't look as nice, so I tried to make a simple stem with brown paper....and I kinda like how it looks! hehehehe! Simple!

Quilling is definitely a simple way to decorate a plain blank card and make it look fancy with a fraction of the cost because it's all made of paper. :) I'm loving it!

My new toy!!!


Yay!! I've already received the hand powered paper shredder today!!! Woooohooooo!!! I'm so excited about it!! hehehehehe!! The paper shredder arrived safely to me this morning . Love the service the company gave me when I ordered this paper shredder. It's so easy to order from them and the delivery is fast too. :)

The name of the website where I got this hand powered paper shredder from is call IZUKKA.

I quickly unwrapped the box and took out the paper shredder and gave it a quick check to see how to assemble the handle and then I proceed on trying it out. It was a breeze!!! It's so easy!!! I can cut hundreds of paper strips in just minutes!!! WOW!! It's so fun! LOL!! Funny how a hand powered paper shredder can make me feel so happy ahahahahhahahahah!!

One thing that you will notice when you use the paper shredder to shred your color paper is that each of the paper strips you shred has rough textures at both sides of it made from the paper shredder's cutter. So when you coil each paper strips into quilling patterns, it will have that textured look on it unlike if you cut the paper strips using a razor blade. If you use a razor blade, the paper strips will have a smooth clean finish at the sides of it. For me, I don't really mind with how it looks. Because I think it looks ok to me even though it has the rough texture. The rough texture gives it a special touch hehhehehehe. The important thing here is that, the paper shredder saves me a lot of time and energy. I no longer have to hurt my hands trying to cut the paper strips one by one. :)

So the choice is yours.....you can cut the paper using razor blades or paper shredder. I've already made a quilling card as a sample for everyone to see the difference of the quilled flower and leaves I made using the paper strips cut by the paper shredder.What do you think??? It looks ok right? Not much of a difference from using a razor blade. At least when you use a paper shredder, you'll always get the same size paper strips every time you cut them. Same standard size :). 

I love using this cute machine so far hehehehe......hope you will give it a try too! I specifically ordered it blue in color because blue is my favourite color......there are also other colors available for you to choose from. I'm so glad I bought this because this will help save me a lot of my time and energy! Wooooohoooooo!!!!!

Sweet celebration on Father's day

*Photos here taken from the Cahayahatiku-lyfrina's blog post - with permission*

Yesterday I was so surprised to get a message from one of my May 2010 blog giveaway winners. She had written a post about Father's day that really touched my heart. The father's day story emphasized a lot about the sacrifices her husband had to make for her and her cute little daughter.

I was also surprised to see that she used the card she won as a father's day card for her hubby. It was so touching to see her cute little daughter writing wishes on the card for her dear father. Awwwwwww........I got all teary eyed looking at the photos...huhuhu....yup, I am quite a sensitive person. Things like this makes me cry easily .....but it's a happy cry ya....not a sad cry. :) I was so happy to see that my card made someone so happy. Of course I do realize that it's not just about the card.....it's mostly about who gave the card to you and the warm wishes written from the heart from your loved ones that can make a huge difference. It's the thought, the heartfelt wishes.....that can make someone feel extremely happy and they will remember it forever.

Do check out the her father's day story at the link HERE.

Thank you so much Alyani for sharing with me this lovely post. I really appreciate it! :) Hope you and family stay happy and healthy always. Insyaallah..... :)

Paper shredder


Ever since I found out about the mini paper shredder from Miyyah@Kertas's blog, I wanted to buy one for me to use in my quilling projects. Unfortunately I wasn't able to find the exact same type of mini paper shredder like Miyyah bought, anywhere here in Alor Setar. I was even thinking of going to Kuala Lumpur sometime next month to buy one at the place she mentioned, which is at the IT Hyperstore, Ground floor, in Cineleisure Damanasara. The USB mini paper shredder sold there costs only RM29.00. Cool huh??? I wanted to buy that so badly huhuhuhuu.........

Then one day as I was googling about mini paper shredders, I found one website that sells this hand powered mini paper shredder! Just like the one you see at the photo above. Isn't it cute??? . The mini paper shredder costs only RM26.90 and shipping costs only RM8.00 (poslaju). The paper shredder cuts the paper into 0.3cm strips size. It's just the perfect size for quilling! I want to order this!!!

I can imagine myself easily make my quilling projects without hurting my fingers just by using this machine hehehe! I really hate cutting the paper strips one by one using the razor and metal ruler. It takes forever to cut them by hand.  By using the paper shredder, it will just take seconds! Cool huh? :) 


Check out the video I made below on how to use the hand powered mini paper shredder.


June 2010 Blog Giveaway!!!


Hello my lovely readers! It is that time of the month again when I hold a blog giveaway for my loyal readers :) For this month, since it is the month of June, month number 6.....so that means there will be 6 lucky winners who will be chosen this time around. Can you imagine that it's already the 6th month of the year??!!! I'm still not able to accept that hahahaha.....gosh how time flies super fast!!!!

Those 6 lucky winners will be receiving each one a quilled flower theme pop up card just like the photo you see above. As you all know, recently I made a poll at my blog to find out and also to help me decide on what type of theme that you would like to win for this month's blog giveaway. As the poll ended, it shows that the most wanted or most desired card by my lovely readers is the flower theme card!!! It's a clear winner!! So, this really helps me decide what card I should be making and giving away to you! Yup! I prefer to give something that you would love to have rather than give away something to you just for the sake of giving. :).

Prize for June 2010 Blog Giveaway:
Quilled roses card (with pop up flowers inside)
Size of card - 14.9cm x 14.9cm


Rules on how to participate in this blog giveaway is quite simple. Just follow the guidelines below to entitle yourself as a participant.


Here is how you can win this lovely card. You can earn an entry by following the simple steps below....

1. You must "FOLLOW" this blog / "BE A FOLLOWER" . If you are already a follower, then you can
    straight away follow the next step below.

2. Leave a comment on this post. You  can write a comment or give suggestions regards to my card blog.
    PLEASE REMEMBER ----> Be sure to also write your name and your valid/active email  
    address at your comment.

3. YOU MUST WRITE about this blog giveaway at your own respective blog and include the photo you
    see above in it as well. Don't just put the photo of the prize at your blog. You have to at least write
    about what the photo is about.  Then, link your post to this blog giveaway.  PLEASE add the URL link
    of your blog post in your comment area as well so that I can easily go and visit and read your post at your
    respective blog.

Ok! Those are the simple things that you need to do in order to get an entry in this blog giveaway. Those who fail to follow will not be included in the lucky draw list. This giveaway ends on the 30th of June 2010 at 11.59pm. I'm giving more time and chance for more people to participate! So that's why I'm ending this giveaway on the last day of June. 6 lucky winners will be chosen by a lucky draw and the names of the winners will be announced on the on the first week of July 2010......All the best of luck to all participants! Thank you!!! :)

XOXO,
Lin

Quilled roses

Quilled roses card

I'm so happy that finally I managed to prepare the card that I promised to make for the June 2010 Blog Giveaway. A quilled flower theme pop up card!  I'm so happy with how it turned out. :)  At first I had a hard time figuring what color combination I was going to use. In the end I chose the pink and green combo. :)  For the quilled flower theme.....I wasn't so sure of what type of quilling flowers I should make. Then I thought of the quilled roses...and so I practiced and practiced to get that same size of roses so many times, my fingers hurt....huhuhuhu. But at last, I got them figured out. So happy about that! Yay!

This a square card with a lovely apple green color. I love this color. So fresh and bright looking! I love how it looks when combined with the white doily and pink combo. I also made a simple pop up inside the card. Flowers weaved at the pop up :). Very simple...very cute heheheh. As mentioned before.....there are no wordings for this card. It can be used for any occasion. :)

Fan fold flower


This is something that I believe anybody can do! If I can do it, so can you! hehehe! I love simple projects like this.You see, I was searching for more origami tutorials that I can do but was not able to find a simple one....most of the ones I found are quite complicated for me to try. Then I stumbled upon these fan fold flower tutorials that I find pretty interesting and can be used for my handmade cards. Love them!

I tried to make the fan fold flower using my buffalo fancy card paper.......I chose the one that is slightly thin.....there are buffalo fancy card paper that are thicker in the market. But I chose the thin one for this experiment. Then I realised that it's still a little too thick. I should have chosen something a lot thinner. I also think that if I could find a patterned paper it would also look prettier hehehehe. But for experiments, I just used anything I have available at home. In the videos, you can see that they used a craft punch to make the scallops at the edges of the fan fold flower. Since I don't have that type of craft punch, I just used a scallop patterned scissors to create that effect. But my scallops are quite small in size, so when folding it, it was pretty tricky since I had to fold them quite close to each other.

The only thing that I felt was so difficult in making this fan fold flower was the part when I had to glue the round red paper onto the purple fan fold flower.....I had to glue it on both sides of the purple fan fold flower and the purple fan fold flower kept jumping up on me hahahaha.....it won't stay put! Arrghhh! That really tested my patience! LOL! I'll try to make more of this fan fold flower using a more suitable type of paper soon......hope you guys will give it a try too! :)


Stamping origami shirts!


I got carried away again playing with the origami shirts hehehhe! Since I don't have pretty patterned papers available to make origami shirts, what I did was I made them using plain thin papers and decorate them with a flower clear stamp! I know it doesn't look like Hawaiian shirts.....because the flowers are nothing at all like the "bunga raya" (Hibiscus) ekekkeke......it's just a simple flower pattern.

The flower clear stamp is one of the clear stamps that I received from my dear friend Sandi Staley. :) I"m having fun stamping using this clear stamp....it's so easy to see where you are stamping on the paper when the block is transparent. You'll know exactly where to stamp your patterns using this clear stamp. And another interesting thing about it is that you can remove the stamp from the block and place it on any position you like on the block again. Cool huh?? 

After stamping them on the origami shirt.....I continued by coloring inside the flowers with  yellow color pencil....and added the green leaves to the flowers using a green color pen. The orange dots were made using an orange color pen. This is just an idea of how you can decorate a simple plain origami shirt. You can decorate it any way you like it with other materials too. Let your creativity out and just have fun with it!! 

Origami dress!


After making letting my fears out and adventuring into the world of origami this week, I've so far only manage to make origami shirts...lots and lots of it hehehe......and so today, I'm doing another origami pattern which is the origami dress! It's the simplest origami dress pattern I've found! I've seen other designers who have done a much more complicated origami dress....with lots of pleats on the skirt but for me as a beginner, I'll try and do the simplest one first and see how it goes from here. :)

Again.....as always, I would google about it and search on Youtube or any other tutorial websites that can give me a demonstration on how to make the origami dress from scratch. For me, it's easier to follow the steps if I look at the live video instead of looking at step by step photos of instructions. Especially if the live video is a good one....with clear visual and instructions.

I don't have a lot of beautiful patterned papers or origami papers or wrapping papers.......I have just a few that would be suitable for me to use for this particular experiment. This particular one that is actually  a leftover from a previous project I did way back when....... for one of my card designs hehehehe. So what I did was, instead of cutting it into a square shape, I cut it into a rectangular shape....specifically A6 size. As you can see from the above photos, I followed the steps according to the video tutorial below......and even though I used a rectangular shape paper, it was still possible to make the origami dress....so it does not have to be specifically a square shape.
Since I used an A6 size paper to make the origami dress, the dress end up looking quite big in size....in fact it almost fill up the pink half A4 size card you see above. So if I wanted it to be smaller, I would have to cut the paper in smaller sizes in order to make the origami dress look smaller and cuter. I didn't decorate it or put any embellishments on it yet. This is just one of my experiments hehehehe. So perhaps later I'll make more origami dresses for me to use for my card designs. I'm really happy I tried this....hopefully I get to try more origami patterns soon! Check out the video tutorial below if you wish to try making one yourself! Have fun! :)


Floral theme!

OK people! Looks like it has been decided! The poll that you've have voted have shown that the "Floral Theme" is the most favorite theme among the three themes I placed at the poll. :) 51 people voted and the results are as below.

30 people voted for the floral theme.
15 people voted for the love theme.
6 people voted for the birthday theme.

So....hopefully by end of  this week, I'll be posting an entry regarding the June 2010 Blog Giveaway. Can you believe it??!! It's already coming to the 6th month.....which means this will be the 6th time I'm holding this  blog giveaway this year!!! Gosh!! I still have not yet decided  how the design will look like. What color combination....what size.....what type of pop up to make.....etc etc.....hmmmmmm........decisions decisions! hehehe!

I noticed that a lot of people love the combination of pink and green.......that would be lovely too to make quilled flowers with that combination in mind. Well.....we shall see how it goes....since I have not yet decided on the color combination :) The card would definitely be a card that can be used for any occasion because there won't be any wordings on it. So you can use it for weddings, or as a thank you card.....or birthday card.....anything that you wish, anything your heart desires! There will be lots of quilled flowers on it and also a pop up flower arrangement on the inside. :) Can't wait to start designing it!

Origami shirt card

HB077

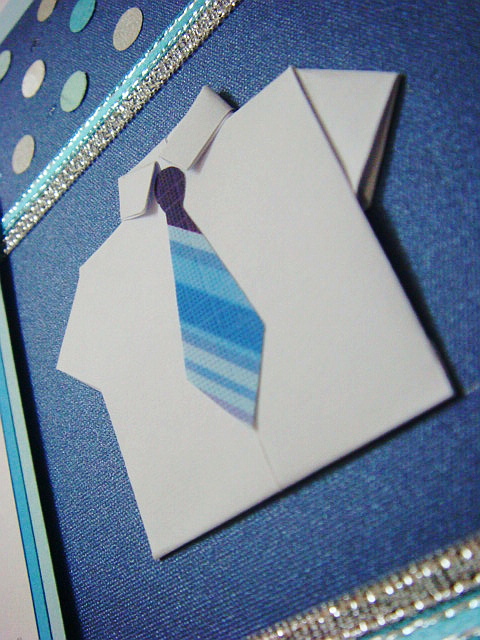
OK! Here it is!! The origami shirt card that I made yesterday! :) I can't believe I made those origami shirts! hehehehe......After practicing it many many times....I finally get to make it look neat enough for me to embellish them on this handmade birthday card. This birthday card is another request I got from the same customer who ordered the quilled flower card that I made recently. She had to wait a long long time before I got her orders done. :(  One thing though that I like about her is that, she always wants me to surprise her with the designs......so she never request for any particular theme for any of the birthday cards she orders from me.....instead I have to figure it out myself and surprise her with new designs :). She accepts any designs.....as long as I custom made them for her. 

My Mom and Aunt couldn't stop laughing when I showed them the origami shirts......they have never seen it before.....and my Aunt thought that the birthday card was meant for a little boy. But I told her, that it was actually meant for an adult man....hehehehe.....I don't know...maybe it's those polka dots that made her think that way? But I kinda like those polka dots hehehehe.....maybe because I've always been doing a lot of stripes before....so I wanted to do something a little different this time. 

For this card.....I made the origami shirts that has sleeves that looks like a real one. You know....the one that can actually put a hand through it...hehehehe......you can have a look at it closely at the top detail photo of the origami shirt above. I made the tie using a stripe wrapping paper. You can also make an origami tie or make a tie using ribbons. I will probably make them for my next card :).

I had a hard time figuring what designs to make for the pop up inside the card.......in the end, I made a blue birthday cake and some gift boxes between it. Very simple...... :)

Featured Post

How to make two tone tear drop shape quilling flowers

We are coming close to mid February and I'm blogging about something that I did last January! LOL! It's been a month sin...