Hello I'm Azlina
I love to design, make pretty handmade cards and exploring other crafts. Do support me on YouTube.
I share a lot of quilling and craft tutorials there.
After a few weeks, finally today I'm announcing the winners of the February 2012 Blog Giveaway! Yay! I'm glad that it's finally come to this day when I can announce who are the winners. And the winners are as below:
Number 20 is Miss Fatma Fazira
Number 2 is Miss Nor Saradatul Akma
Congratulations to both of you! I'll be sending you both an email soon to get your full details. Thank you so much for your participation in this month's blog giveaway. ;)
I'll be revealing the giveaways for next month soon!! Watch out for it ;) Jeng jeng jeng! :D
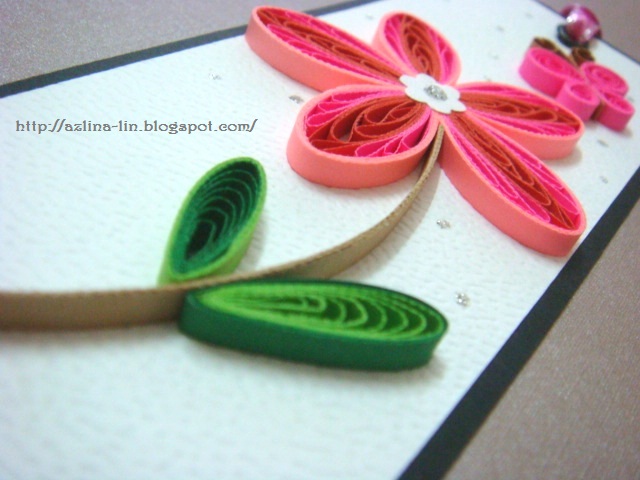
A simple bookmark made for my customer.........simple and sweet ;) Focusing more on the flower itself.....rather than on other things on the bookmark. So the flower is the first thing you would look at when you look at the bookmark.
I used the quilling comb technique for the leaves and flower.....can't help but be obsessed with that technique these days :).
Ok! As promised in my previous post. Here are the close up photos of the quilled flower arrangements project that I made for my students. :)
This is my first try at making a quilled flower arrangement on an A4 size board. I was actually inspired by my quilling students who loved to make their quilled flower arrangements on boards. They made it in smaller sizes and I thought it was a really nice idea to do something similar with a different twist to it. I made it using just 3 different colour strip of paper.....gold, silver and metallic pearl white paper strip. All the quilling strip used for this quilled flower arrangement were made using papers that were shredded using the mini paper shredder. I chose a thicker type of paper for this project as the paper available were a bit thicker compared to the other quilling strips I've used before.
Since the board itself was quite plain and didn't have a nice background for the quilling arrangement I had in mind, I decided to paste on it an A4 size paper that had a metallic silver sparkle to it's black background. It seemed perfect for my idea.
For this one, I made a new flower pattern for it. Not sure what to call it hihihi. I've never made something like it before on any of my card designs. It's something new I created using the quilling comb. I really like the middle part of the petal....the silver part...and I did a husking technique on both sides of the silver part then wrapped it with a metallic white quilling strip. The first time I made it when I was experimenting with the new idea, I only made the silver part as a petal by itself. Only later on that I decided to combine it with the husking technique. I love the combination of the two techniques :).
I don't know why but I've always loved to arrange flowers this way. Love seeing it slanting to one side....either to the left or to the right. For this one I made the Royal flower patterns but with the husking technique inside that has two different type of colour paper....gold mixed with silver. I just love doing this type of combination. I love the leaves I made for this flower arrangement too! I made it using the combing technique and see how the loops are so close to each other?? That's because I used a really small hair comb ;).
I hope to have the time to make more projects like this in future. Perhaps something more complicated, something more challenging. I always have difficulty trying to do that because I always end up making it look so simple. ;)
This was just a fun project that I proposed to my students sometime ago. I thought that after much learning about quilling, it would be great if we could swap our artworks with each other. There were no specific theme or concept. Freestyle!! So it was up to us to decide what we would give to each other. Each person had to prepare two artworks to swap with.
We had our meeting at a fast food restaurant today and had the swap session there. Although it was a bit rushed but I'm happy with my student's artwork as they tried so hard to come up with something creative for me. It's the effort that counts the most and I could see that they tried their best. None of us knew what each other was going to make and it was nerve wrecking waiting to see what each one of us made for today's swap. We were all afraid to show each other's work to each other hahaha.....it was so funny! We really didn't know what to expect! :D
But, I'm glad that each one of us came up with something different. I made quilled flower arrangements, Fauzan made quilled photo frames and Remy made quilled cards. So it's wonderful that each one of us got different things. :)
For the first time ever I made something like this to give away. I've always been making cards and bookmarks but never done something that is A4 in size and suitable for framing. I've always wanted to do this and this was a great opportunity for me to give it a try. And I loved it. Thank God my students loved it too. I was a bit worried that they won't like what I made for them hhihihihi. I will blog and upload close up photos of my artwork in my next post :).
The artworks made by me, Fauzan and Remy :)
*This photo is taken from Remy Sunbae's album with permission
The two quilled photo frames above were handmade by Fauzan and the pink flower photo frame is mine now! ;)
*This photo is taken from Remy Sunbae's album with permission
The two cards above were handmade by Remy and the quilled heartshape card is mine now! ;)
Thank you Fauzan and Remy for making this swap session possible today. I really appreciate everything you guys did for me. You guys are awesome! Good job! Can't wait for our next project together! ;)
I guess my cards are getting simpler and simpler. I'm more into doing simple, straight to the point cards I suppose these days. And these simple note cards are an example of what I love doing lately. Flowers and leaves are my favourite subject and I just can't seem to get enough of them. Even if I keep repeating the same design or layout, still, I enjoy making them that way. These two cards were simply made for my February 2012 Blog Giveaway. I didn't show a close up view of the cards yesterday, so now, I'm giving you a chance to view them at a closer angle. :)
It's time for another giveaway! Yes, now it's for the month of February. I'm still going to giveaway to two lucky winners, 1 card each.
For February, I have 2 new cute note cards to be given away. I can't wait to see who are the 2 lucky winners who will be receiving these cards at the end of this month! ;)
OK! Now, let's check out how you can win these cards :).
1. Anyone can join this giveaway. Bloggers, facebookers, twitters.....practically anyone from all over the world. :)
2. Just make a post about this giveaway at your blog or at your facebook or at your twitter. If you don't have a blog or facebook or twitter account, then just write your details at the comment box.
3. Write down this details at the comment box :
- Your full name
- Your email address
- The link to your post (if any) - Follow my blog or Like my fan page
The deadline for this giveaway is on 28th of February 2012. Winners of this giveaway will be picked randomly. I will be making an announcement on 29th of February 2012 to declare the winners.
Thank you for participating in this giveaway and all the best everyone!! ;) Do share this post with your friends!!!
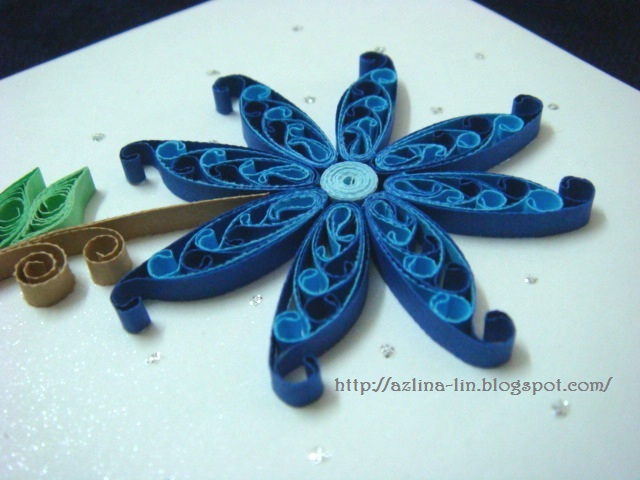
In my previous post, I made a tutorial on how to make cascading loops flower just by using one color of quilling paper, but in this post, I am showing you in the video how to make the same type of flower by using two different colours of quilling paper. One colour is sky blue and the other colour is dark blue.
I prefer to use contrasting colors to make the cascading loops so that I will be able to see a clear difference between the two colours after the petal is formed. In this tutorial, I am using a quilling comb instead of a hair comb because the quilling comb is much easier to use for this technique compared to my hair comb. To start making it, all you have to do is just glue the two quilling strips together at one end and then you can start making the loops with the quilling comb.
Do check out the video tutorial below on how to start making this two tone cascading loops flower :).
After making a few cascading loops, you can start assembling them to form the flowers below. :)
This is a simple example of a cascading loop flower
This is an example of a cascading loop flower that is twisted at the top end of the loop.
This is an example of a twisted cascading loop flower. I used a slotted quilling tool to twist each loop inside the petal. I start twisting one loop at a time, one to the left and one to the right, from the bottom loop till the top loop.
Hope you will be able to understand the tutorial and make these flowers yourself. All the best!! ;)
There's so many things you can do with this cascading loops technique. You can make flowers with it, you can make leaves and many more. Here I'm just showing you the basics of how to make cascading loops flower.
I've made a video of how to make each cascading loops petal for you to use to make flowers with. It's very easy to do. You can use a quilling comb or a hair comb. Do check out the video below.
The above photo show the different sizes of the cascading loops that you can make depending on the length of the quilling strip. The longer the quilling strip, the longer set of cascading loops you will be able to make. :) Hope this tutorial helps give you a better understanding of how to make the cascading loops flower. :) All the best!! :)
I received this order last year but only now do I get to complete it for my customer. This design might look familiar to some, and it's because it's an old design I did last year. You can view the design at the link --> HERE. The old design had the wordings "I MISS U SO MUCH" on the card and for this one, my customer just asked me to replace the MISS with LOVE. She requested this card for her anniversary and Valentine's day occasion :).
I gotta say that this is one of my favourite designs to make. One reason is because of the wordings. I love the effect it gives to the card. Simple as it may seem, it's not that simple to make. It's worth the trouble though :).
I've been wanting to try to do this design in a different colour combination but didn't have the chance to do it yet. Hopefully I'll get a colour combination I really like and do it sometime this year ;)
This is another version of the tiny loops flower, but it is made using the quilling comb. As you can see, when using a quilling comb, the flower becomes a bit bigger than the flower made using a hair comb. And the tiny loops inside it becomes a bit bigger as well. So, in other words, the bigger the gap between each pin, the bigger the loops will be.
Here's a video tutorial I made to show you how I made each petal of the tiny loops flower using the quilling comb. :) Check it out!
As you can see from the video, I used only 1 strip of quilling paper to make the tiny loops petal and then wrapped around it half a strip of the quilling paper to secure the shape of the petal.
Once all the petals are made, you can join them together to form a flower. The quilled tight coil is just a sample of how you can decorate the flower to make it look more complete. But of course there are many other ways to decorate the middle part of the flower to make it look beautiful. I'm just showing the simple basics of how you can decorate it :).
The above photo shows how you can make the petal look a little different by pinching both ends of the petal to get the marquise shape petal. If you compare the shape of this petal with the petal made using the hair comb, this petal is a lot slimmer than the one made using the hair comb right? It looks a bit longer and slimmer to me :). So each one is special in it's own way. The quilling comb makes a different effect and so does the hair comb. Up to us to choose which we prefer the best :). So for those who owns a quilling comb, you can also give this technique a try! All the best!!
Would you like to know how I make these flowers? Do check out the tutorial I made below ;).
This video tutorial shows how to make each petal of this flower. This is my first video by the way. I've never made one before in my life. I'm so happy that I finally get to do it this year. Hopefully I will be able to make more and more video tutorials for my readers this year ;).
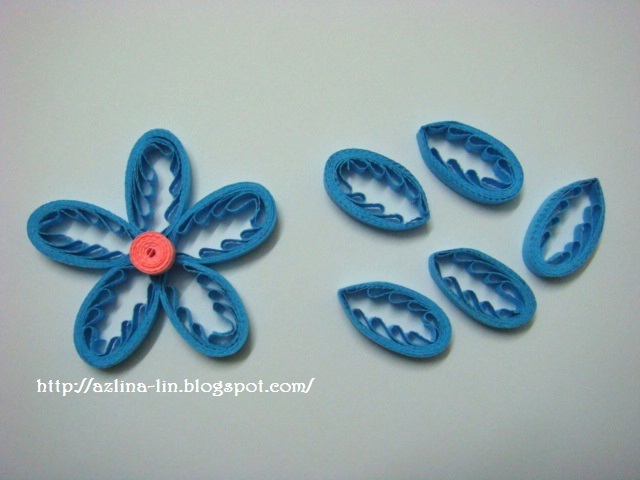
I used one quilling strip to make the multiple loops petal and then wrapped around it half a strip of quilling paper to secure the shape of the petal.
After making 5 petals, you can join the petals like the ones you see above by gluing them together using white glue or polystyrene glue to make them look like the shape of a flower. Then you can add a small quilled tight circle in the middle of the flower to make it look more complete.
If you don't like the tear drop shape of the petal, you can pinch both ends of the petal to get a marquise shape petal.
So many of my readers have asked me to make this tutorial for such a long long time now but I never got the chance to do so earlier. I'm so happy now that I finally got the chance to share with my readers how I make these flowers. So this is the basic of how you can make this type of paper flower using quilling strips and a hair comb. Do give it a try! All the best!! ;)


.JPG)
.JPG)
.JPG)
.JPG)


.JPG)
.JPG)
.JPG)
.JPG)