My second pop up mosque Raya card in 2017

HR031

Hello again everyone.....so how was your raya/eid celebration this year? Mine was good, hope yours were good as well! Had lots of goodies to eat after one month of fasting. Luckily I didn't over do it and gained back all the pounds that I've lost! Phew! Eat in moderation ok guys! 😀😀😀

So here they are, as I mentioned before in my previous post....the 5 pieces of pop up mosque raya cards that I made for the same customer who ordered those small ketupat ribbon raya cards. I think I was much more sad to see these go compared to the other raya card design. Perhaps because the papers that I used to make the flowers are no longer available. All used up for the 5 cards. I didn't even have a sample of the card in my collection now huhuhuhu.....it's just a coincidence that the papers used were just enough for that amount of card, not more, not less.


I started off by making the flowers first. I had to make sure there was enough of them for all 5 cards, otherwise I would have to choose other type of pattern papers for the flowers. After that was settled, then I can start thinking of the other parts of the design such as the sentiments on the card, pop up mosque etc etc.

The die cut flowers were fun to make. It's been a while since I last used the dies....I think the last time I used them was for the Happy New Year card. At first I thought of using the same gold ink that I used for the other raya card.....but unfortunately it was not suitable at all for this design because of the colour combination makes the card look dull. So I had to use the bright orange watercolour instead. So instead of using the calligraphy pen, I had to use the watercolour brush. There are times when using the brush can be challenging especially if you don't have a steady hand. So again, because of that a lot of mistakes were made and I had to make quite a lot of the sentiments so that I can choose the best ones for the 5 raya cards.


You must be wondering why I made the pop up mosque this way instead of making the pop up look like a square building just like the mini mosque I made before. Well, one thing I've learned when making those mini pop up mosque was that if I wanted to make that type of pop up mosque I would need a bigger card so that there is ample space inside the card for people to write their wishes in it. So to get that bigger space, the pop up mosque had to be done this way instead.

If you are also wondering how I made those mosques, well, they were cut by hand as well using the craft knife. Same goes with the green bushes as you can see I had to cut them up by hand as well. It was time consuming indeed. But somehow I kinda like the process of arranging them at the sides of the mosques. 

Well that's about it. That's what happened and hopefully next year I'll get the chance to prepare them again. The process was really interesting and I did all of them myself to the best of my ability. Do check out the video below to view how the card pop up opens up. Thank you!! 😁😁😁


Salam Aidilfitri pop up card

 HR030
 
I started working on these pop up raya cards in early May.....I was supposed to start earlier because I received the order to make them about a month earlier if I am not mistaken but there were a lot of things that came up and my work had to be put on hold for quite a long time. One of the reasons that made it almost impossible for me to work was when we had to rewire the entire house. A fire might start if we didn't do something quick. I had to remove all my things from my studio since it was no longer safe to work in it.  All the things inside it had to be taken out and placed in another room. Since I had a LOT of stuff, it took me at least 3 days to do it!!! Yikes!! 3 days gone just like that. After that, it was hell for me because I was not able to do work comfortably in the other room. Most of the time I was working on the floor and aching all over trying to get some work done because I just cannot just sit around doing nothing. It's just not me. It also took the electricians quite some time to do the rewiring in my studio and plus I requested them to make some shelves. I really needed those shelves badly since I had a lot of things in my studio that needed a space to keep them in. But that was just my room....I had to worry about the wiring done in the other parts of the house as well. I never knew it was going to be that difficult and so time consuming. But I am glad we did it and now we feel a lot safer at home with the rewiring all completed. Alhamdulillah....I thank God that everything went well.
 
 
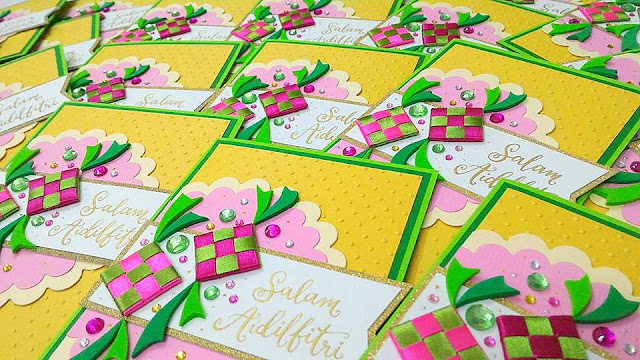
I was requested to make about 30 pieces of this raya card design because my customer wanted 30 small raya cards and 5 big ones. I'll blog about the big ones later. She was hoping that I could do 40 pieces of the small ones and I wished the same too but since my time was quite limited, I only managed to get done 30. I started by making the ketupat ribbon first like the ones in the photo above because they are the focal point of the card. So it was important to get them done first. Once they are settled, I proceeded with other parts of the card.


Writing the raya wishes with the calligraphy pen was nerve wrecking! The thing is, even though I knew I was not good in writing them, I still did it anyways. HAHA! It's all because I wanted it to be my own. I didn't want it to look like anyone else's. Ever since I started writing my own wishes or sentiments on cards, I never stopped. I never print anymore....I just write them myself. It's more satisfying I suppose. Plus it's a good way for me to practice writing. Nerve wrecking because I had to make sure it all look almost the same in writing. I mean I know they won't be 100% exact! But at least, they look similar.


Back in 2015, I already had the idea to make this mini pop up mosque. In fact I even uploaded a photo of it in my Instagram back then. I had already made 2 similar big pop up mosques for 2 other raya cards that year and was thinking of making the mini one for my friends and family. But I never had the chance to do so due to my other commitments. So it was postponed till this year. The minute my customer requested the raya cards, I just knew I had to use this idea for the cards no matter what.


Cutting the green and dark green foams for the ketupat ribbon was a bit of a challenge really. None of them are exactly the same on all the cards as I cut them randomly using just plain scissors. But it was great seeing how they turned out in the end. I just wanted the frills for the ketupat to be something other than ribbons because they would look a little stiff. I've done it before years ago in my earlier raya card designs. They did look kinda stiff. So by making the frills with foams, I'm able to make them sway to the left and right like as if they are blown by the wind or something like that. Making them look more flowy. I kinda like that flowy effect.


I even made my own envelopes for the raya cards. It's easy to do so with the Martha Stewart's score board. Nothing is impossible with it. It was a breeze!! Don't forget to check out the video of the card below. You'll get to see how the mini pop up mosque pops up when it opens. Thank you!!


Quilled sunflower birthday pop up card

HB136

I wanted to blog about this card for a month now......made this one in May....but only now in June, I have the time to blog about it. I've just finished making a lot of raya cards and I just had to take a short break to blog about this card first before blogging about the raya cards some time this week. Need to make time to blog too right? :)

I had a great time making this one...especially the part where I get to make the quilled sunflowers. I've done quilled sunflowers before but they were simpler and not as many as I did for this new card. When I got a request from my customer, he told me that he actually loved my quilled sunflower card design that I did some years ago. The only thing he wanted to see differently in the new card is MORE SUNFLOWERS!!! That's all. HEHE! And that's what I tried my best to do.....made 6 of them and struggled to decide how to arrange 6 of them on that card, which was not that big.....only half the size of an A4 paper.

I told him that I could not make the card design exactly like the old one because we as designers will always tend to change our ways of designing over the years and will try to make the design more current to what we love to do at the moment. I'm glad he agreed and let me do it my way. I've always enjoyed accepting orders from customers who gives me the freedom to design. So it doesn't feel so stressful when I'm designing the card itself.


To start making the quilled sunflowers, I begin with making the fringed center. To make the center part of the sunflowers, I had to cut the fringe with the scissors. Gosh that was a real challenge to do! I had to test all my scissors to see which one felt the most comfortable using when making the fringe because it's going to take a long time to cut them one by one. Finally I felt like this scissors was the most comfortable for me.


I'm beginning to really enjoy using the calligraphy pen! And the ink!! Love the ink!! I think from now onwards, I'll never buy new coloured pens anymore. Because using the calligraphy pen and ink is much more fun to use plus the ink don't smudge at all once it is dried on paper. I love that! My writing may not be great but at least I'm working on it....it will definitely improve over time. The more practice I have with it, the better I'll get at it, God willing 😀.


Sewing the beads on the thick card stock was absolutely the most exciting thing for me to do! I love doing this a whole lot even though it takes a long time to complete! Love looking at it glittering beads once they are all sewn on the paper. The possibilities are endless with beads. I would love to experiment more on this technique when I have the time. I have lots of beads to use up and what more better way than to use them for my handmade cards. If you would like to give it a try too, make sure you get yourself the good quality beads that are the same in size. This is because you want the line of beads to look pretty on the card. You wouldn't want the beads to have different shapes and sizes....😉.


Love making the quilled lady bugs too! They are a cute addition to any flower arrangements! They make the flower arrangement look less boring. Adds excitement to it! Haha!


Heart shaped quilling leaves! I wanted to make the leaves to look different from the ones I made for the old sunflower card design, so I opted to make them this way. It's a lot easier too! LOL!


I changed the pop up sunflowers inside the card too.....anything to make it look different from the old design. I used those craft punches that you can see from the photo above to make those sunflowers. It's easy to make them when you have the right tools. Been keeping that sun shape craft punch for a long time now, at least now it is put to good use.

Do check out the video of the sunflower card below! Thank you!

Mini ketupat project


Made lots of mini yellow and green ketupat this year!! Woooohooo!💗💗💗 It's always exciting to make them although they are kinda challenging to make because of their tiny size! Usually I would make them for my handmade cards but for this year, is a little different.

I got a request from Elsie of @mangoliciousmango to make 50 pieces of the mini ketupat for her Raya Gift Packs. I thought it was a really fun idea and agreed to do it. Usually I would never take such requests because I prefer to make them for my handmade cards instead. But since she really needed the help, I just couldn't say no. And I am glad that I had the time to do it too when she needed them.

As you can see from the photos, Elsie makes homemade fruit jams! How cool is that!? I think it's so cool! I can't make any myself hahaha! Never tried making them before. Well, in each of her Raya Gift Pack there's 3 bottles of jams, Mango, Mango-Pineapple and Durian jam. Also included are crackers and spoons so that you can eat them with the jams. Each pack only costs RM50.00. What's wonderful is that part of the sale proceeds will be donated to Cherish Life Home to support it's animal shelter. So do visit her Instagram and check it out. Get your yummy homemade jams today and be able to be part of the charity as well 😍😍😍. 

It would be a great idea to give to your loved ones those fruit jams and spread the happiness around. Make someone happy today! 💓💓💓


Featured Post

How to make two tone tear drop shape quilling flowers

We are coming close to mid February and I'm blogging about something that I did last January! LOL! It's been a month sin...