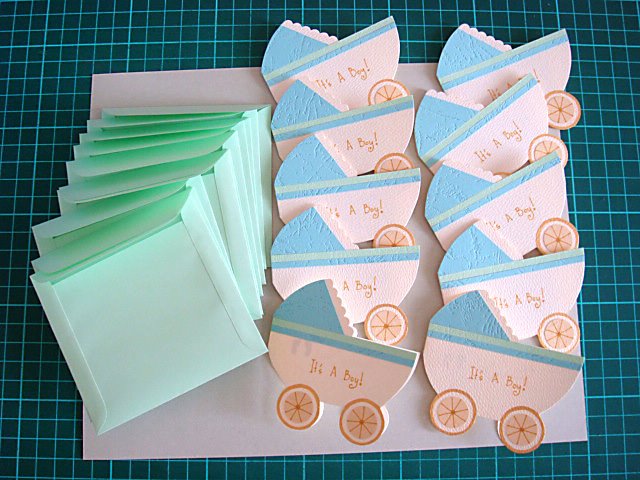
Baby stroller shaped card


NB005


I am so excited about this new baby gift card I made for my customer.....it's for her new born's majlis cukur jambul! :) She specifically wanted the shape of the card to be of a baby stroller. So I designed a simple one for her that would be suitable to be given as a Thank You card to her friends and relatives who have helped her during the ceremony......

This card is pretty small in size.....about 8.5cm wide x 8.5cm in length. It comes with a cute little handmade envelope that's soft green in color! So cute! :)

Buttons and sequins unite ( version 2 )

V012b
* This card design has a pop up heart inside it. This was a request from a customer of mine for his loved one. The pop up hearts is a similar pop up that I made for my Anniversary card, but I changed the colors of the hearts to match with the colors of the buttons and sequins on the front of the card. :)


The photos above shows another sample of V012a with the wordings "Happy Birthday".
This was a request from my customer :)


V012a

This is a new version of the V012 Valentine day card I designed earlier......I wanted to make the same design with a different color because I plan to give this to my Mom hehehe......and I know how much she loves this color combination compared to the other one. This new version has a mixture of orange, gold, beige, cream, peach, soft browns, yellow and sprinkles of red and white too.....I love this combination as it somehow looks very bright and cheerful.

There is no wordings on the inside, just like the original V012......so if you would like me to add in the wordings for you, or a pop up heart shape on the inside, that can be done too..... :)

Baby doll dresses

BD002
Silver doily on gold metallic paper.


BD001
Gold doily on silver metallic paper.


I got carried away with the paper doily lately :) I tried numerous patterns and the first was the wedding dresses.....now it's the baby doll dresses.....I still have a few more that I want to publish soon. But due to the heavy workload I have not been able to do so. For this particular design....I like to keep it simple, using a heavy stock card that has some texture on it.

This card comes with a matching beige handmade envelope. It has no paper inserted on the inside....no wordings either. But if you wish to request for wordings, I can do it for you with additional charges. This cute card is suitable for birthdays....especially for your little princess on her birthday :) .

The symbol of love

W008

White doves have always represented love, loyalty, fidelity and honesty......which is why I love using this motif for occasions such as weddings and engagement......perhaps for Valentine as well?? hehehe. For me, this design fits all..... :)

White butterflies

W007

Another postcard greeting I made which has two white butterflies flying with two wedding rings above them. It's very sweet and simple.....adding a wide white satin ribbon to match! :) I used simple scallops cut out at the four edges of the postcard, almost similar to my white doves postcard except that this one, if you look closely has no sharp points between the scallops.

You can write your wishes at the back of the postcard.......but if you wish for me to paste a piece of white paper at the back of the postcard for easier writing purposes, that can be done for you too. No problem at all......just let me know if your preference. :)

This card too can be sent to couples who are getting engaged as well as for couples who are getting married.....both occasions are suitable! :)

White doves...

W006

I just adore these two love birds ehehehe.....sweet little white doves facing each other...in love forever hehehe LOL! :) I'm trying out something new in my card making....which is making postcards greetings....so this design was made in the form of a postcard.....not folded. It's very simple, elegant and straight to the point. No ribbons or fancy decorations on it.....I like to keep it simple and neat.

The white doves were hand drawn and hand cut with scissors.....including the gold heart and gold rings.....I think, in this case...making the rings were the most difficult.....it's small and one slip of the finger and it will all be spoiled....so I had to be extra careful not to make a mistake....otherwise I would waste the paper... :)

I think that this card is not only suitable to be given for wedding occasions but also for couples who are getting engaged. :)

A silver wedding dress

W005b (Limited Edition)

This is another version of the wedding dress card series....the difference is in the wedding dress itself. I chose a light soft silver doily with rose flower as it's intricate lace for the dress. Love it! :) I also did a different type of cut for the top part of the dress. A lot more simpler than the gold wedding dress.

The inside of the card, I place a white paper for writing on personal wishes. It matches the white handmade envelope too. :)


A gold wedding dress

W005 - red color paper (Limited Edition)


W005a - without ribbon (Limited Edition)
This is another version of the W005. It has no gold ribbon at the side of the card and I cut the all the four corners of the cards with the patterned scissors. I think I adore this new one more hehehe :)

W005 (Limited Edition)
I just love this one! So excited about this! I have made cards with paper doily before and it was a fun project......but I love this recent doily project better. Simply because I get to make wedding dresses with them hehehe! :D There isn't much going on the card.....just a simple cut out of the gold paper doily and I added a small 1/8" gold ribbon on the side......and I made patterns using my pattern scissors on the corners of the card.....just to make it a little fancy....and last but not least, I wrote at the side of the wedding dress "Happily Ever After"....as a simple wish for the bride to be.....so that she will live happily ever after with her hubby :).

This card is like a note card, so it's pretty cute and not too small and not too big.....suitable to be given together with a wedding gift for the bride :)

You are my heartbead ;-)


V013

This is another one of my new experiments! This time around it's with fine silver color wires and stringing it up with a mixture of colorful seed beads. I had a hard time figuring out how to go about it at first.....since I couldn't find a good tutorial video online that could teach me how to wrap the seeded wire around the heart.....so I had to use my own creativity instead...LOL! Which in this case took me a few days to find a solution and a few wires that was ruined in the process! hehehehe!

I used a red foam and cut it into the shape of a heart, to be the base where the seeded wire would hang on to.....I just love using the foam...it's so flexible...I also smeared the foam with silver glitters.....just love using those these days! The sparkle makes everything look fancy! :) I tried to glue the furry wire around the foam too.....to make it look neat around the edges of the heart....glad that worked well....I was afraid that it wouldn't work but luckily it did, simply by using UHU to make it stick. :)

There are no wordings made for this card......but if you wish to have any, I can make them for you and paste it on the inside of the card as well as the outside, which ever suits your fancy! :)

Buttons and sequins unite!

I love looking at the shine from the sequins when it hits the light! :)

V012

I have always wanted to do this! I've seen numerous artist doing this before...so it's not really something new. But there is always something different in the way all those artist do it. All have their own interpretation of their artwork. That's what makes it special.
I've seen them arranging buttons of numerous sizes and forming them in the heart shape form......some took photos of it and print them out as cards instead of selling the actual handmade card itself...I saw the other day in an online website where this lady showed how she made the heart shape button card......and she used all sorts of shapes of buttons, some are round, some are in the form of flowers and in different colors too. It was the cutest thing! I just loved it. It was so simple.....and I wanted to do the same too but I don't have the different sizes of buttons like she does......so I thought maybe I could mix sequins with the buttons instead and see how it looks. So this is how it came about.

I only wrote there "Love You"....a simple message on the card beside the buttons and sequins....there are no wordings or pop ups inside the card. But if you wish for me to write or decorate the inside of the card for you.....it can be done...no worries. I just love keeping it simple......as the card has a soft pink paper inserted on the inside, you can always write your own personal wishes on it.....it would be more personal and meaningful to your loved one! :)

Sending you all my love...

Colorful hearts popping up! :)

V011

All my loving.....I will send to you..... :) I had The Beatles song in my head when I was thinking of a new Valentine Day card to design today. I just love that song! I must say that this design is another one of those designs that tested my patience! hehehehe! Probably because I had a lot of heart shapes to draw and cut out one piece at a time....and that was just the beginning! Then I had to paste them on the card and make sure that the arrangement look good. Sometimes I just don't know why I do these things.....but I was in the mood to do it at the time, so I did it! :D

As you can see here, I used a red foam which I have cut out in the shape of a heart....4 pieces of it which I pasted on the card around the wordings. And then I decorated it with some silver glitters.....I just love doing that! Love the sparkling effect!

I also made my first pop up heart inside the card! Yay! And I decorate it with lots of colorful hearts on it.....that was fun to do! :) I made sure the pop up heart is popped up at the top of the card so that there is enough space below it to write personal wordings too. I also made a soft pink handmade envelope to match the card.....and I added a layered heart behind it :)

Experiment with foam...

V010
I recently bought a new material for my card making activity hehehe.....It's actually a foam! I've been wanting to buy it for the longest time! But never had the chance to do so until one day I came across it at the craft department store. It is available in a variety of colors and can be bought individually....so you can choose which colors you like and not have to buy all sorts of colors at the same time. It's quite affordable too, which is why I bought it!! hehehe!!

I simply love the texture and the flexibility of the material. It's so soft and easy to cut out with scissors or with a craft knife. I started out cutting heart shapes since I was thinking of designs for Valentine's Day.....and it was such a breeze! I love the fact that I can write things on it easily and decorate on it too as you can see here I applied some glitters on it!

This card is blank on the inside but has a matching paper inserted inside it for writing on personal wishes.....but if you would like me to print out your personal wishes there, that can be done too! Whatever you wish, I will do my best for you! :)

Red cherry blossoms pop up card

See how the flowers pop up when the card is opened! I just love how it looks! :)

CNY007

I must say that this must be my most favorite Chinese New Year cards for this year....I simply adore it because this is one of my experiments with making pop up flowers. I've done the simple pop up lotus flower already and now I've done the seven flowers pop up card! Yay! I've changed the flowers a bit, plus I added some decorations on the inside of the flowers to make it look like a cherry blossom. I just love watching it bloom up when I open the card!! It's so exciting! :) Funny how simple things like this can excite me so much! Silly me! hehehe! LOL!

I made this design on a smaller sized card, but it can also be done on a bigger sized card, no problem at all......this is because the flowers can be made in different sizes according to the size of the card. This card comes with a matching soft pink handmade envelope.

Thank you so much to my dear friends who have inspired me to do this!! Appreciate it so much......especially to Michael.... :) I wouldn't have dared to do this without your support!!! LOL!


Featured Post

How to make two tone tear drop shape quilling flowers

We are coming close to mid February and I'm blogging about something that I did last January! LOL! It's been a month sin...